Showing posts with label Summer. Show all posts
Thursday, September 1, 2011
Peach & Watercress Salad
Peaches, much like strawberries, have an amazing ability to swing both ways. From dinner to dessert that is. They make a mean pie and are equally at home in a salsa or on the grill along side a steak. This dish marries the sweet peaches with savoury salad fixins and a healthy, happy union ensues. We got crisp, cool romaine lettuce and cucumbers, juicy peaches and bitter, peppery watercress all tossed in a pungent, shallot studded balsamic vinaigrette. All I'm trying to say is, peaches too, make a bangin' salad.
Peach & Watercress Salad
Origin: Jaime, Impeccable Taste
Notes: Please, I urge you, if you are a lover of dairy, dot this salad with crumbled goat cheese. It will be a fantastic addition. Toasted, slivered almonds are also great with this combo.
Ingredients:
Salad
1 head romaine lettuce, chopped into 1 inch strips
4 Lebanese cucumbers or 1 English (seedless) cucumber, chopped into bite sized pieces
4 large, ripe but firm peaches, sliced
1 bunch watercress, trimmed, leaves and tender stalks only
Dressing
1/4 balsamic vinegar
1 teaspoon Dijon mustard
1 teaspoon honey
1/4 cup olive oil
2 tablespoons shallots, finely chopped
salt and pepper
Prepare the dressing. In a small bowl, whisk together the balsamic vinegar, Dijon, honey and a pinch of salt and pepper. Slowly drizzle in the olive oil, whisking constantly to emulsify. Add the chopped shallots, stir and let stand at least 10 minutes before serving, or cover and refrigerate until ready to use.
Prepare the Salad. In a large serving/salad bowl, layer the romaine lettuce, cucumber, peaches then watercress. Drizzle with dressing, toss and serve immediately. Serves 4.
Thursday, August 11, 2011
Roasted Sweet Potato Salad
What would happen if a whole summer whizzed by completely potato salad free? It hurts to even think about, it just wouldn't be right. I was determined to come up with an alternative for all of us white potato avoiders. I knew I could make this happen with the nutritionally dense sweet potato, as long as there were enough savoury, tangy and creamy ingredients to balance out the sweet. A healthy dose of onion, pickles, chopped egg, and celery did the trick! With all of those delicious flavours mingling together, it's quite the summer party.
Roasted Sweet Potato Salad
Origin: Jaime, Impeccable Taste
Notes: To keep things paleo friendly, I make my own mayonnaise, avoiding sugar and unhealthy vegetable oils. I have included my recipe for homemade, olive oil mayonnaise below. Obviously, good quality store bought mayo works great here (I like Hellman's). I have incorporated instructions on how to roast sweet potatoes into this recipe. Everyone has their own method for this. I have found that preheating the baking sheets helps them crisp up pretty well. You can roast the potatoes however you like, you just need to start with well roasted, bite sized chunks of sweet potato for this salad.
Ingredients:
4 pounds sweet potatoes, unpeeled and scrubbed clean
1/2 cup coconut oil (or any vegetable oil), divided
salt and pepper
5 hard boiled eggs, peeled and chopped
1 bunch green onions, finely sliced (about 1 cup)
4 large dill pickles, chopped (about 1 1/2 cups)
4 celery stalks, finely chopped (about 1 cup)
3/4 cup mayonnaise
2 tablespoons Dijon mustard
salt and pepper
To roast the sweet potatoes, preheat oven to 475 degrees, place oven racks in the middle and lower positions. Insert 2 baking sheets to preheat along with the oven. Heat coconut oil in a small saucepan until just melted/liquified. Chop the sweet potatoes by halving them lengthwise, then cut the halves lengthwise into 2 or 3 pieces, chop wedges into bite sized pieces (about 1/2 inch thick). In a large bowl, toss the potatoes with 4 tablespoons of oil and a generous sprinkle of salt and pepper. When the oven and baking sheets are preheated, carefully remove the baking sheets and drizzle 2 tablespoons of oil onto each sheet. Carefully distribute the sweet potatoes between the 2 baking sheets in a single layer, and pop them back in the oven. Roast for about 15 minutes, then flip the potatoes with a spatula, and put the trays back into the oven, rotating the 2 sheets top to bottom. The potatoes should be done after an additional 10 minutes of roasting. I like to put each sheet under the broiler for a couple of minutes to get some nice brown crispy spots. Remove potatoes and cool completely.
To prepare the salad, combine the mayo and Dijon mustard in a small bowl. Toss the cooled sweet potatoes, eggs, onions, pickles, celery and mayo mixture together in a large bowl. Season with salt and pepper, chill and serve.
Homemade Olive Oil Mayonnaise
Origin: Jaime, Impeccable Taste
Notes: This mayo can be made with a food processor or by hand with a very strong arm. I use light or extra light olive oil for this recipe to keep the flavour neutral. The mayonnaise made in the food proccessor will be more stiff then that made by hand, but it's worth it to save time and your arm.
Ingredients:
2 egg yolks, preferably room temperature
1 teaspoon Dijon mustard
2 teaspoons lemon juice
3/4 teaspoon salt
1 1/4 cups light (not extra virgin or first pressing) olive oil
Food processor method: Put the egg yolks, Dijon, lemon juice and salt in the bowl of a food processor fitted with the steel blade. Measure out your olive oil. Process the egg and seasonings for about 30 seconds until lightened and thickened slightly. Keep the motor running and using a teaspoon (it helps control the speed at which you add your oil), drizzle oil SLOWLY, teaspoon by teaspoon, drip by drip, through the feed tube of the food processor. After you have added about 1/2 cup, you should see a thick mayonnaise forming, you can now increase the speed at which you add the remainder of the oil, still using the teaspoon to drizzle in a slow, steady stream. Stop processing immediately after you have finished adding your oil or it may separate. (Use your ears, you can actually hear a change in the sound of of the mayonnaise as it loosens before it separates. Stop processing immediately if you hear this!) Chill until ready to use.
By hand: Dampen a tea towel, fold it, and place it under a medium sized mixing bowl (this will keep the bowl steady when whisking like a mad person). Measure out your olive oil. Place egg yolks, Dijon, lemon juice and salt in the mixing bowl, whisk vigorously until pale and slightly thickened, about 30 seconds. While whisking continuously, using a teaspoon, VERY SLOWLY drip the olive oil into the egg yolk mixture. By VERY SLOWLY I mean it should take you about 4 minutes to add the first 1/4 cup of olive oil. Once the first 1/4 cup of olive oil has been added, you should see the mayo starting to emulsify. You can increase the speed at which you add your oil now, still using the teaspoon to drizzle in a slow, steady stream. It should take you an additional 4-5 minutes to add the rest of the oil. Do not over mix or the mayo may separate. Chill until ready to use.
If your mayo separates: Have no fear! It can always be rescued. Get your arm ready, it's going to take some more elbow grease. Start with one egg yolk in a medium, clean bowl. Whisk the egg yolk vigorously for about 30 seconds, until it has lightened in colour. Slowly add your separated mayonnaise, drip by drip into the new bowl, whisking continuously. This should bring the mayo back to a smooth, creamy consistency.
Labels:
Healthy,
Paleo,
Paleo(ish),
Recipe,
Salad,
Side Dish,
Summer,
Vegetarian
Wednesday, July 27, 2011
Blueberry Tea Cake
I'm back with something sweet to offer my neglected friends. I took a couple of weeks off to enjoy some summer! We had lots of fun houseguests, people popping in and out, birthday parties and bonfires...ahhhh, 'twas fun indeed. I made this cake twice during my time off! It was so light and fresh tasting, perfect for a summer dessert or afternoon tea. No one could resist a slice! It's a simple, homey cake, moist and choc full of fresh blueberries. It has a hint of lemon and it's slathered with a decadent cream cheese frosting. Really delightful!
Blueberry Tea Cake
Origin: (slightly adapted) Bill Granger via Leite's Culinaria
Notes: This cake comes from Aussie chef Bill Granger, who uses terms like "scant" (just short of the prescribed amount) and "heaping" (just a bit more than the prescribed amount), just go with it, his hazy measurements worked for me! The recipe calls for superfine sugar (not icing sugar), you can easily make your own by placing granulated sugar in a food processor or blender and processing it until finely ground but not powdery. This recipe yields an uncomplicated 9 x 13, single layer cake. The cake kept well for at least 4 days, popping leftovers into the fridge when it wasn't being devoured.
Ingredients:
Cake
3/4 cup sour cream, heaping
1/2 teaspoon baking soda
12 tablespoons unsalted butter, at room temperature, plus more for the baking dish
1 1/2 cups superfine sugar, heaping
2 teaspoons finely grated lemon zest
1 teaspoon vanilla extract
3 large eggs
2 cups fresh blueberries
3 cups all-purpose flour, scant
1 1/2 teaspoons baking powder
Frosting
8 ounces cream cheese, room temperature (1 block)
1/2 cup unsalted butter, room temperature
1 teaspoon finely grated lemon zest
1 teaspoon vanilla extract
juice from 1/4 lemon
16 ounces powdered/icing sugar (I used 4-5 cups, I just kept adding sugar until I got the frosting consistency that I wanted)
Preheat the oven to 350 degrees. Butter a 9 x 13 inch baking pan and line it with parchment paper, allowing the excess paper to hang over the edge of the pan.
Combine the sour cream and baking soda in a small bowl and let stand for 5 minutes. In a separate bowl whisk together the flour and baking powder, set aside. Place the blueberries in a separate bowl and toss with a spoonful of the flour mixture, just to coat the berries.
In a large bowl, beat the butter and sugar with an electric mixer until light and creamy. Add the lemon zest and vanilla and beat until combined. Beat in the eggs, 1 at a time, then add the sour cream mixture and beat just until combined.
Add the remaining flour mixture to the wet ingredients and mix just until combined. Gently fold the flour-coated blueberries into the batter, being mindful not to overmix.
Spoon the batter into the prepared pan and bake for about 45 minutes, until a toothpick inserted in the center comes out clean. Let cool in the pan for about 10 minutes, then carefully remove the cake to a wire rack to cool completely, either by using the parchment paper as handles or by inverting the cake onto a wire rack and then inverting it again.
When the cake is completely cool, frost with cream cheese frosting.
To make the frosting, beat all of the ingredients except the sugar with an electric mixer until light and fluffy. Gradually mix in the sugar and beat until smooth. Use immediately.
16 ounces powdered/icing sugar (I used 4-5 cups, I just kept adding sugar until I got the frosting consistency that I wanted)
Preheat the oven to 350 degrees. Butter a 9 x 13 inch baking pan and line it with parchment paper, allowing the excess paper to hang over the edge of the pan.
Combine the sour cream and baking soda in a small bowl and let stand for 5 minutes. In a separate bowl whisk together the flour and baking powder, set aside. Place the blueberries in a separate bowl and toss with a spoonful of the flour mixture, just to coat the berries.
In a large bowl, beat the butter and sugar with an electric mixer until light and creamy. Add the lemon zest and vanilla and beat until combined. Beat in the eggs, 1 at a time, then add the sour cream mixture and beat just until combined.
Add the remaining flour mixture to the wet ingredients and mix just until combined. Gently fold the flour-coated blueberries into the batter, being mindful not to overmix.
Spoon the batter into the prepared pan and bake for about 45 minutes, until a toothpick inserted in the center comes out clean. Let cool in the pan for about 10 minutes, then carefully remove the cake to a wire rack to cool completely, either by using the parchment paper as handles or by inverting the cake onto a wire rack and then inverting it again.
When the cake is completely cool, frost with cream cheese frosting.
To make the frosting, beat all of the ingredients except the sugar with an electric mixer until light and fluffy. Gradually mix in the sugar and beat until smooth. Use immediately.
Thursday, July 7, 2011
Bloody Mary Tomato Salad
I spotted this recipe on Smitten Kitchen the other day and within 2 hours I was eating it for dinner. Smitten Kitchen is my all time favorite food blog and I try many of Deb's recipe recommendations. But when she starts talking Bloody Marys, I move fast. You see, Bloody Marys are a bit of a thing in my family. My Nanny loved them, and always added a secret ingredient - pickle juice! As long as I can remember my Mom has ordered at least one, without fail, every time we dine out. I adore them anytime, especially with brunch (my Hubby too!). And my younger sister? Well, she may have caught the Bloody Mary bug worst of all, ordering doubles every time we are out. Geez, I guess we all sound like a bunch of lushes...but it's in our blood, it can't be helped. I always have the classic Bloody Mary ingredients on hand so I sprung into action and recreated this Bloody Mary Tomato Salad. All of the complex Bloody Mary flavour is there, without the booze of course, and it goes amazingly well with a good steak.
*I have to mention, in Canada, we do not drink Bloody Marys at all. It's this odd little variation on the Bloody Mary that has become a classic Canadian cocktail and a family favorite...the Caesar! The ingredients and taste are virtually the same, substituting Clamato juice for Tomato juice...tomato juice with a hint of clam juice!! It's essentially the same drink, but I guess we Canuks should really call this a Caesar Salad. Ha!
Bloody Mary Tomato Salad
Origin: Bon Appetit via Smitten Kitchen
Notes: The original recipe pairs this salad with a nicely seasoned flank steak. I had 2 bone-in rib steaks in the fridge so I went with those.
Ingredients:
1 cup red onion, finely chopped
3 tablespoons Sherry vinegar, divided
2 pounds cherry or grape tomatoes, halved (3 pints or 3-10 ounce containers)
1 cup celery hearts, chopped (light coloured inner stalks and leaves)
1/2 cup brined green olives, finely chopped, plus 2 tablespoons olive brine
2 tablespoons prepared horseradish
1 tablespoon Worcestershire sauce
1 teaspoon hot pepper sauce (Tabasco)
1/2 teaspoon celery seeds
1/4 cup extra virgin olive oil
salt and freshly ground black pepper
Place the chopped onion in a large bowl, pour 1 tablespoon sherry vinegar over onions and let them sit for 10 minutes, stirring occasionally (this will temper the onion's bite). Add tomatoes, celery and olives to the onions.
To make the dressing, whisk remaining 2 tablespoons vinegar, reserved olive brine, horseradish, Worcestershire, pepper sauce and celery seeds in a small bowl. Slowly drizzle in olive oil, whisking constantly to emulsify.
Pour the dressing over the tomato salad and toss to coat. Season with salt and pepper to taste. Set aside until needed, or cover and refrigerate for up to 4 hours. Serves 8-10.
Wednesday, June 29, 2011
Arugula Salad with Strawberries
I just can't get enough of these gorgeous strawberries! Gotta get my daily fix...they are like crack to a semi-strict clean eater like me! Not only do they make a great snack and have countless uses in luscious desserts...they have savoury applications too and they make a bangin' salad. This is another old favorite that fits seamlessly into our Paleo diet lifestyle. Sliced strawberries take a little soak in some balsamic vinegar which sweetens and intensifies their flavour. Then the strawberry magic is tossed with peppery arugula, toasty pecans and a simple balsamic vinaigrette.
Arugula Salad with Strawberries
Origin: Martha Stewart
Notes: We enjoyed this with a simple steak on the BBQ and the 2 of us polished off the salad. Double the amounts below to feed 4-6 people. This salad shines extra bright when a part of a breakfast or brunch spread.
Ingredients:
1/2 pint strawberries, rinsed, hulled, and quartered (I used about a cup, sliced)
2 tablespoons balsamic vinegar, divided
2 tablespoons olive oil
1/4 teaspoon salt
1/4 teaspoon pepper
2 bunches arugula, washed, dried, and trimmed (I used half of a 5oz container of organic baby arugula)
1/2 cup toasted pecan halves, roughly chopped
In a large bowl, toss strawberries with 1 tablespoon balsamic vinegar, let sit 5 to 10 minutes.
In a small bowl, whisk together remaining tablespoon balsamic vinegar with the olive oil and salt and pepper.
To the strawberries, add vinaigrette, arugula, and toasted pecans. Toss to combine, and serve immediately.
Thursday, June 23, 2011
White Chocolate Dipped Strawberries with Citrus Sugar
Local strawberries are here! There is nothing like ripe, juicy strawberries grown close to home. One of the many delights of summer. This is an exceptional way to enjoy them, simple and so pretty! Their juicy goodness still shines through, but the creamy white chocolate and bright citrus sugar are great compliments.
White Chocolate Dipped Strawberries with Citrus Sugar
Origin: Epicurious
Notes: When melting white chocolate be sure to not let any moisture get into the bowl. The chocolate will seize up with the addition of the smallest bit of water. I like these served cold.
Ingredients:
2 tablespoons sugar
1/2 teaspoon finely grated orange peel
1/2 teaspoon finely grated lemon peel
6 ounces high quality white chocolate (I used Callebaut), chopped
16 large ripe strawberries
Melt the white chocolate over a double boiler, (stir the chocolate in small bowl set over a saucepan of barely simmering water) stirring until melted and smooth. Remove from over water.
Holding 1 strawberry by the stem, dip the berry into chocolate, shake excess back into bowl. Turn the berry dipped-end up and sprinkle with citrus sugar, place on prepared sheet. Repeat with remaining berries, chocolate, and sugar. Chill until chocolate sets, about 30 minutes.
Monday, June 13, 2011
Chipotle Steak with Brussels Sprout Slaw
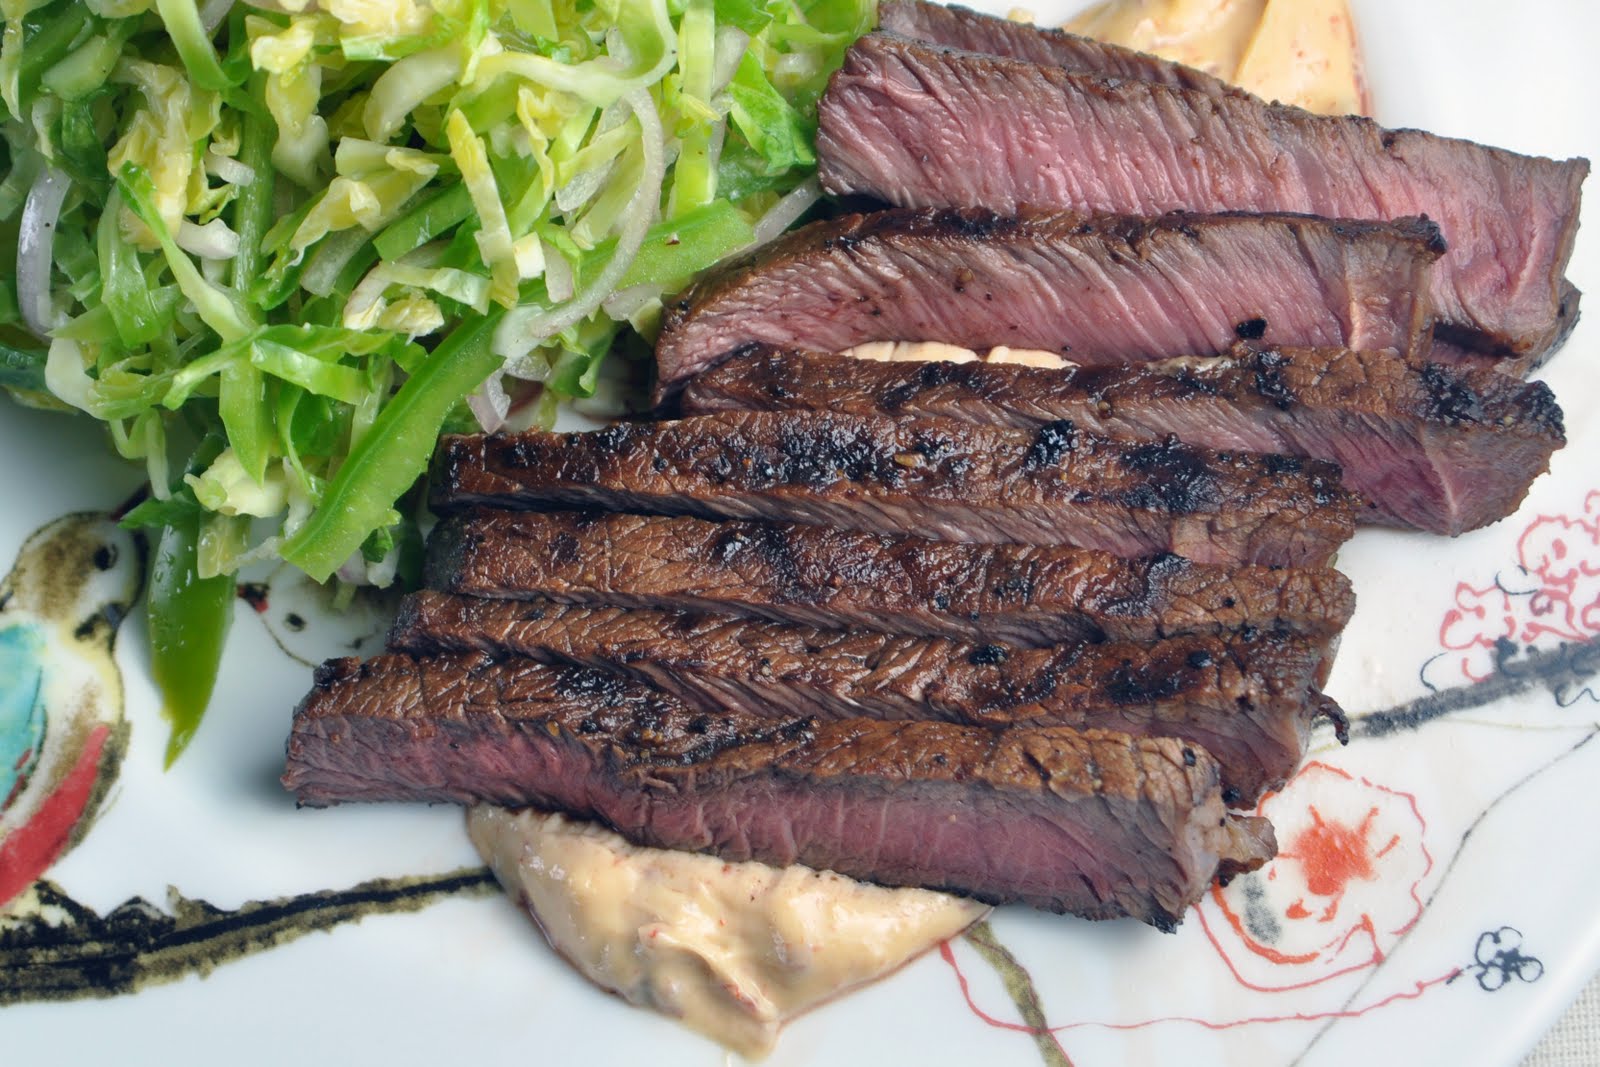
This is a meal I have been wanting to recreate for a while now. It's an attempt (a successful one!) at a fabulous dish I had at a favorite local restaurant, Allium, on one of their tapas nights. The sadly small (but appropriate for tapas) portion size left me wanting more, I couldn't get this dish out of my head. Robust, smoky chipotle flat iron steak with creamy chipotle aioli, accompannied by a light, grassy brussels sprout slaw. It was great! I did a very decent job with my copycat recipe. I finally got my fill of this great dish! Try it out...or visit Allium for the real thing!
Chipotle Flat Iron Steak
Origin: Inspired by Chef Arup Jana, Allium
Notes: Allium used "flat iron steak" for this dish, my cut of beef was called an "inside blade steak", I believe both are from the shoulder, just cut slightly different.
Ingredients:
2 chipotle peppers, finely chopped (from a can of chipotles in adobo sauce)
1 teaspoon adobo sauce
3 tablespoons balsamic vinegar
3 tablespoons olive oil
salt and freshly ground black pepper
upto 2 lbs beef steak, flat iron or blade steak
Mix the chipotle peppers, adobo sauce, balsamic vinegar and olive oil in a glass baking dish or a resealable plastic bag large enough to hold your beef. Add steaks and toss to coat, marinate for about an hour (or more if desired).
When you are ready to grill, remove steaks from marinade, sprinkle with salt and pepper and grill. This a tougher cut of meat so medium (even medium-rare) doneness is ideal. Make sure to get a good sear on the meat but don't cook it too long. We grilled it on high heat for about 4-5 minutes per side.
upto 2 lbs beef steak, flat iron or blade steak
Mix the chipotle peppers, adobo sauce, balsamic vinegar and olive oil in a glass baking dish or a resealable plastic bag large enough to hold your beef. Add steaks and toss to coat, marinate for about an hour (or more if desired).
When you are ready to grill, remove steaks from marinade, sprinkle with salt and pepper and grill. This a tougher cut of meat so medium (even medium-rare) doneness is ideal. Make sure to get a good sear on the meat but don't cook it too long. We grilled it on high heat for about 4-5 minutes per side.
Origin: Inspired by Chef Arup Jana, Allium
Notes: You can adjust the amount of chipotle pepper to control the heat to your liking.
Ingredients:
1/2 cup mayonnaise (I make my own olive oil based mayo)
1 chipotle pepper, finely chopped (from a can of chipotles in adobo sauce)
1/2 teaspoon adobo sauce
1 small clove garlic, minced
salt
In a small bowl, combine the mayo, chipotle, adobo sauce and garlic. Season with salt. Refrigerate until ready to use.
Brussels Sprout Slaw
Origin: Inspired by Chef Arup Jana, Allium
Notes: This slaw is really good! Forget everything you think you know about brussels sprouts. The raw, shredded brussels sprouts are surprisingly mild with a nice crunch.
Ingredients:
brussels sprouts, about 5 cups shredded
1 green pepper, sliced as thin as possible
4 shallots, halved and sliced as thin as possible
4 tablespoons cider vinegar
4 tablespoons extra virgin olive oil
salt and freshly ground pepper
To prepare the brussels sprouts, trim the end slightly and slice them in half lengthwise. Starting at the top of the brussels sprout, thinly slice them, stopping when you get the the core/hard bits.
In a large bowl combine the shredded brussels sprouts, sliced green pepper and shallots. Drizzle with the vinegar and olive oil, season with a generous amount of salt and pepper and toss to combine. Serve immediately or chill for an hour before serving. Serves 4.
Wednesday, May 25, 2011
Kofta Burgers
This past weekend marked the unofficial start to summer in Canada with our Victoria Day long weekend. The time has finally come for cottaging, gardening, boating and BBQs! These burgers are outstanding and would be a hit at any summertime event. Taking cues from my recent trip, I took one of my favorite Israeli meals, the kebab, and changed it up a bit to fit right in at a North American cottage or backyard party. In Israel, Kofta kebabs are usually made of ground lamb or beef, mixed with spices and then formed into logs around skewers. The kebabs are grilled over open coals and served with rice, pita and an assortment of small salads, sauces and pickled things. These all beef Kofta Burgers are loaded with the same fresh flavours and lots of spice, they are juicy and delicious. Served with tahini sauce and fresh, bright tasting salads, all stuffed into a pita, they are superb!
Kofta Burgers
Origin: Jaime, Impeccable Taste
Notes: These burgers are delish! I have included recipes for some great accompaniments, but you could simplify things by serving them with pita bread and classic burger toppings like lettuce, tomato, pickle and onion. BUT...the tahini sauce is an absolute must!!
Ingredients:
Burgers:
2 lbs ground beef (I use 1/2 lean and 1/2 medium ground beef)
1 large onion, roughly chopped
4-5 cloves of garlic, roughly chopped
l handful parsley, large stems removed
1 handful cilantro, large stems removed
4 tablespoons garam masala (a blend of spices, you can purchase it or make your own)
For Serving:
Tahini Sauce (recipe below)
Simple Spring Salad (recipe below)
Onion Pomegranate Salad (recipe below)
pita bread
In a food processor, pulse together the onion, garlic and herbs until finely chopped and combined.
In a large bowl combine the ground beef, onion/herb mixture, garam masala and a pinch of salt. With your hands, mix everything together thoroughly. Cover and chill the mixture for an hour or until ready to use. Form the meat mixture into patties. Indenting the middle of each patty with your thumb will help the burgers cook evenly and keep them from shrinking up into balls once they hit the grill.
Grill the patties to your liking. We usually grill them over medium heat for about 7 minutes per side. It depends on your grill, the thickness of the burgers and how well you like them cooked.
Serve the Kofta Burgers with pita bread, tahini sauce and salads.
**The burger patties are great without the pita too, just serve with salad and tahini sauce for a paleo friendly meal.
Simple Spring Salad
Origin: Jaime, Impeccable Taste
Notes: The lemony greens and crunch of the radishes and cucumbers are great stuffed into a pita with the Kofta Burgers.
Ingredients:
6 cups crunchy baby greens, I used baby Red Leaf and Green Leaf lettuces (regular Romaine would be fine)
4-6 small Lebanese cucumbers, sliced into thin rounds (or use an English/seedless cucumber)
1 bunch radishes, sliced into thin rounds
1 lemon, juiced
1/4 cup extra virgin olive oil
salt and freshly ground pepper
In a large bowl combine the lettuce, cucumbers and radishes.
Just before serving, add lemon juice, olive oil, some salt and A LOT of freshly ground pepper. Toss and serve.
Tahini Sauce
Origin: Classic Middle Eastern Recipe, Jaime, Impeccable Taste
Notes: This sauce is a must with the Kofta Burgers.
Ingredients:
1 cup pure tahini (ground sesame paste)
1 lemon, juiced
2 tablespoons extra virgin olive oil
2 small cloves garlic, minced
salt
3/4 cup warm water
a handful of fresh parsley, large stems removed (optional)
In the bowl of a food processor, combine tahini, lemon juice, olive oil, garlic and salt (start with 1/4 teaspoon and add more to taste). Pulse to combine. Add the warm water and process until smooth (you can add more warm water as necessary to achieve desired consistency). Add parsley and pulse to chop/combine.
This can be made without a food processor. Mix everything by hand (chop your parsley first). But note that it may take a while to achieve a smooth consistency as the tahini and lemon juice will seize up. The warm water will help loosen the mixture.
Onion & Pomegranate Salad
Origin: Adapted from The Food of Israel, Sherry Ansky & Nelli Sheffer
Notes: This salad takes these Kofta Burgers over the top! It acts like a relish or a salsa, adding flavour, sweetness and crunch. To de-seed your pomegranate, in a bowl of water, submerge chunks of the pomegranate and release seeds into water. The seeds will sink and the white, pithy stuff will float, and your hands will stay clean!
Ingredients:
1 large red onion, halved and thinly sliced
1/2 cup chopped fresh mint
1/2 cup chopped fresh parsley
1 cup pomegranate seeds
juice of 1/2 lemon
3 tablespoons extra virgin olive oil
Place sliced onions in a strainer over a bowl and sprinkle them with about 1/2 teaspoon of sea salt. Let stand for 1 hour, tossing occasionally. The onions will release much of their bitterness as their juices drip into the bowl below. Squeeze out any excess juice. I usually give the onions a quick rinse to remove excess salt and then press them into the strainer to remove liquid.
In a medium bowl, combine the onions, herbs, pomegranate seeds, lemon juice and olive oil. Toss gently, check for seasoning, adding salt if necessary.
Wednesday, September 1, 2010
Sweet Corn Relish
It's the time of year when I become frantic for local fresh produce. I live in fear that within the blink of an eye there will be no more perfect tomatoes, no more sweet, crisp corn, no charming, multicolored carrots, no plump, juicy peaches and no more fresh, sweet berries to be had anywhere. I am currently in a frenzy trying to get my fill. Last night on my way home from work I bought a dozen corn, 4 bunches of carrots, 1 massive green cabbage, 2 huge local cauliflowers, 4 red shepherd peppers, 2 pounds of tomatoes and 4 field cucumbers...for 2 people. I told you...frantic. I need to take a deep breath and cook. Let's start with the picture perfect corn, cabbage and red peppers. I have just the thing. Sweet Corn Relish. This is a fresh, flavourful, relish that is great served as an accompaniment to grilled chicken or steak or try adding it to salad greens.
Sweet Corn Relish
Origin: Cooking Light Magazine
Notes: This recipe is super easy. You just throw everything in a pot and simmer it for a while. My liquid never evaporated as the instructions say...it just got more juicy as the veggies released their moisture. I strained the mixture before I put it into jars, but next time I will leave a little liquid in the jars for extra flavour and juiciness. The author says this relish will keep for up to 6 weeks in an airtight container...but I don't see mine making it past this weekend.
Ingredients:
6 cups fresh corn kernels (about 8 ears)
3 cups chopped green cabbage
1 cup chopped red bell pepper
1 cup cider vinegar
1/2 cup sugar
1/2 cup chopped shallots (about 2 large)
2 teaspoons celery seeds
2 teaspoons mustard seeds
1 teaspoon salt
1 teaspoon cumin seeds
1/2 teaspoon ground turmeric
1/8 teaspoon crushed red pepper
Tuesday, August 24, 2010
Great Girl, Great Grill
Oh man, we had fun last night. I love birthdays. Getting to celebrate someone special and smothering them with love and attention. Having all your best friends and family around. And of course great food...besides the birthday honoree, food is always the next most important thing. Last night we outdid ourselves...the birthday girl deserved it. The BBQ was amazing.
Menu
Peruvian Grilled Chicken
Grilled Rib Eye Steaks with Pickled Farm-Stand Tomatoes with Jalapenos
Hot Dogs for the Kiddies
Roasted Potatoes
Roasted Potatoes
Corn on the Cob
Heirloom Tomato Salad with Basil Cream Dressing
Green Salad with Mom's Famous Dressing
White Sangria (recipe coming soon)
Heirloom Tomatoes with Basil Cream Dressing
Grilled Rib Eye Steaks with Pickled Farm-Stand Tomatoes with Jalapenos
Peruvian Grilled Chicken
Origin, Gourmet, September 2007
Notes: I made this for a large group. I used 24 chicken thighs and I made 5 times the quantity of marinade - 25 cloves of garlic people! I let the chicken marinate for about 24 hours in the fridge and took it out about 2 hours before grilling. I have only included the marinade instructions below. Visit this link for tips on grilling or roasting the chicken. Everyone raved about this chicken. Moist and intensely flavoured.
Ingredients:
1/3 cup soy sauce
2 tablespoons fresh lime juice
5 garlic cloves
2 teaspoons ground cumin
1 teaspoon paprika
1/2 teaspoon dried oregano
1 tablespoon vegetable oil
1 whole chicken (about 3 1/2 pounds), quartered (I used bone-in thighs with skin)
Blend soy sauce, lime juice, garlic, cumin, paprika, oregano, 1/2 teaspoon pepper, and oil in a blender.
Put chicken in a large resealable bag and add marinade. Seal bag and marinate, chilled, 8 to 24 hours.
Pickled Farm-Stand Tomatoes with Jalapeños
Growing up my parents had this huge Sub Zero fridge, and when my young, weak arms managed to pry the beast open, it was always full...of condiments...nothing but jars and more jars of condiments and pickles. There was never anything to put the condiments on...just condiments. I suppose we could have snacked on pickles, pickled herring or pickled beets. Or how about a pickled egg smeared with any kind of mustard you could imagine. No, not so much. My Mom would always manage to whip up great meals for us, I don't know how or with what, but for us kids we could never see beyond the condiments.
As my tastes mature and my cooking skills improve, I can see beyond the condiments. I too can whip up a meal with seemingly nothing. But I am also realizing the importance and merit of condiments, I'm learning to appreciate them and devoting serious fridge real estate to them. I've even started making my own jars of meal enhancers. BBQ sauces, mustards, pickles and this new one...kind of a cross breed between a pickle, a relish, a chutney and a salsa. The ultimate condiment. Pickled Farm-Stand Tomatoes with Jalapeños.
Pickled Farm-Stand Tomatoes with Jalapeños
Origin, Brian McBride, Food and Wine
Notes: I've made this twice now, and the second time I used less oil than the recipe calls for. I liked this change, the tomatoes are less oily and have a slightly stronger vinegar flavour. I used a variety of cherry/grape tomatoes for this batch and found that they held up better than the slices of tomatoes that I used the first time. Either way it's a fabulous addition to the fridge.
Ingredients:
1 cup rice vinegar
1/4 cup light brown sugar
1 teaspoon salt
1 cup extra-virgin olive oil (I used less than 3/4 cup of oil)
1 garlic clove, minced
1 1/2 teaspoons finely grated fresh ginger
1 teaspoon mustard seeds
1 teaspoon coarsely ground black pepper
1 teaspoon ground turmeric
1 teaspoon ground cumin
Pinch of cayenne pepper
6 tomatoes (1 1/2 pounds), each cut into 6 wedges (I used 6 cups cherry/grape tomatoes, sliced in half)
4 scallions, white and tender green parts only, thinly sliced
2 jalapeños, thinly sliced into rings and seeded (I did not seed the jalapeño slices)
In a medium saucepan, bring the vinegar, brown sugar and salt to a boil, stirring. Remove from the heat.
In a medium skillet, heat the oil. Add the garlic, grated ginger, mustard seeds, black pepper, turmeric, ground cumin and cayenne pepper and cook over low heat until fragrant, about 2 minutes. Carefully pour the hot oil into the vinegar mixture.
In a large heatproof bowl, combine the tomatoes, scallions and jalapeños. Stir in the hot pickling liquid and let stand at room temperature for 4 hours or refrigerate for 8 hours, then serve.
Labels:
Recipe,
Side Dish,
Summer,
Vegetarian
Friday, August 20, 2010
Szechuan Green Beans
Remember those fresh, local green beans I was telling you about? Here is another great way to prepare them. These taste just like Chinese takeout, sweet, spicy, savoury and tangy. Szechuan style green beans are full of flavour and so easy to prepare.
Szechuan Green Beans
Notes: Have all your ingredients ready before you start cooking...it all happens so fast and it is easy to burn something if you are not paying attention.
Ingredients:
1 pound fresh green beans, washed, dried and trimmed
1 tablespoon garlic, minced
1 tablespoon ginger, minced or grated
1 tablespoon green onion, white part only, finely chopped
1 teaspoon chili garlic sauce, or Sriracha sauce, or hot sauce (something spicy)
1 tablspoon dark soy sauce (regular is fine - I used it this time - but dark is way better)
1 teaspoon sugar (I used cane sugar)
1-2 tablespoons peanut oil (or coconut oil, or any neutral oil)
In a non-stick pan or wok, heat a little oil over medium-high heat. Add beans and fry for about 5 minutes until they start to shrivel and brown. Remove beans and drain on paper towels.
Here is where it goes quickly. Add a little more oil to the hot pan. Add garlic, ginger and scallions and fry, stirring constantly, for 1 minute. Add chili sauce and fry stirring constantly for 30 seconds. Add the beans, soy sauce and sugar to the pan and cook all together, stirring constantly for another minute or two, until everything is incorporated and heated through.
Serves 4
Thursday, August 19, 2010
Green Bean Casserole Bites
Has everyone tried Green Bean Casserole? Yeah, thought so. It seems to be a Thanksgiving or Christmas thing...but green beans are in season now! That homey, 50s casserole is not the most elegant of dishes, but its tasty...especially when its made with a real Bechamel sauce instead of canned mushroom soup. I was inspired by that casserole, but sought to showcase these local beans in a fresher way.
Green Bean Casserole Bites
Origin: Impeccable Taste by Jaime
Notes: Use the freshest, longest, sturdiest beans you can find. The little, weak ones won't hold the weight of the crumbs.
Ingredients:
2 1/2 cups green beans, washed, dried and trimmed
1/2 cup mayonnaise (I used 1/2 fat)
1 tablespoon soy sauce
1 tablespoon lemon juice
1 teaspoon Dijon mustard
1 can french fried onions, crushed into coarse crumbs
1/2 cup panko breadcrumbs
1/4 cup finely grated Parmesan cheese
1-2 tablespoons olive oil
Whisk mayonnaise,soy sauce, lemon juice and Dijon in a medium bowl. Season with salt and pepper.
Mix crushed onions, panko and Parmesan in a separate medium bowl. Add 1 tablespoon of olive oil and mix with a fork to distribute. Add another tablespoon of oil if necessary to coat all the crumbs evenly.
Dip individual beans about halfway into the mayonnaise mixture, tap off excess on the inside wall of the bowl. Then dip mayonnaise coated end of bean into the onion/panko mixture pressing the crumbs into the bean to adhere.
Place coated beans on a lightly oiled sheet pan. Bake at 400 degrees for about 15 minutes. The beans should have a little bite to them still and the crumbs should be browned. Use a small metal spatula or a knife to help loosen the beans from the pan if necessary. Serve immediately.
Labels:
Appetizer,
Recipe,
Summer,
Vegetarian
Tuesday, August 17, 2010
Warm Puy Lentil, Cherry Tomato and Haloumi Salad
I think that my favorite food discovery of the decade could be Haloumi Cheese. The warm, salty chew satisfies on many levels. Haloumi has a high melting point so it can be grilled or pan fried without falling apart or turning to goo. It helps to turn a few vegetables into a complete, hot meal. This recipe was a cinch to make, perfect for a busy evening. The delicate Puy lentils take some time to cook, but you just put them on, and forget about them until they are ready. This is a great use for those gorgeous rainbow cherry tomatoes that are at every farm stand these days. The finished product is fresh and delish.
Warm Puy Lentil, Cherry Tomato and Haloumi Salad
From BBCGoodFood
Notes: The BBC GoodFood Magazine and Website are great resources. I buy the magazines whenever I see them close to home and they have always been a highlight of train rides through Europe over the years. I always find recipes I love so for me they are worth the extra cost and worth the real estate in my travel bag. The recipes are given by weights and there are minor terminology differences. I just used the recipe as a guideline, I've given my notes in brackets.
Ingredients:
250g cherry tomatoes, halved (1 1/2 cups)
1/2 red onion, finely sliced
1/2 garlic clove, crushed (minced)
1/2 lemon, juiced (or more to taste)
1 tbs olive oil
150g Puy lentils (1 cup dried)
250g pack Haloumi Cheese, cut into chunks (1/2 pack - slice at least 1/2 inch thick and then into rectangles)
a small bunch of coriander, roughly chopped (cilantro, 1/4 cup chopped)
(salt and ground pepper)
Toss the tomatoes, red onion, garlic, lemon juice and olive oil in a bowl. Cook the Puy lentils until just tender (I boiled the lentils in 3 cups of liquid - half water/half vegetable stock), drain and add to the bowl. Season well and toss.
Grill the haloumi until golden (I put my Haloumi into a dry non-stick pan, preheated on medium-high and fried for about 2 minutes on each side). Stir the coriander through the lentils and serve with the haloumi.
Labels:
Main Course,
Recipe,
Salad,
Summer,
Vegetarian
Subscribe to:
Posts (Atom)


