Showing posts with label Snack. Show all posts

Wednesday, July 27, 2011

Blueberry Tea Cake


I'm back with something sweet to offer my neglected friends.  I took a couple of weeks off to enjoy some summer!  We had lots of fun houseguests, people popping in and out, birthday parties and bonfires...ahhhh, 'twas fun indeed.  I made this cake twice during my time off!  It was so light and fresh tasting, perfect for a summer dessert or afternoon tea.  No one could resist a slice!  It's a simple, homey cake, moist and choc full of fresh blueberries.  It has a hint of lemon and it's slathered with a decadent cream cheese frosting.  Really delightful!


Blueberry Tea Cake
Origin: (slightly adapted) Bill Granger via Leite's Culinaria

Notes:  This cake comes from Aussie chef Bill Granger, who uses terms like "scant" (just short of the prescribed amount) and "heaping" (just a bit more than the prescribed amount), just go with it, his hazy measurements worked for me!  The recipe calls for superfine sugar (not icing sugar), you can easily make your own by placing granulated sugar in a food processor or blender and processing it until finely ground but not powdery.  This recipe yields an uncomplicated 9 x 13, single layer cake.  The cake kept well for at least 4 days, popping leftovers into the fridge when it wasn't being devoured. 

Ingredients:

Cake 
3/4 cup sour cream, heaping 
1/2 teaspoon baking soda 
12 tablespoons unsalted butter, at room temperature, plus more for the baking dish 
1 1/2 cups superfine sugar, heaping
2 teaspoons finely grated lemon zest 
1 teaspoon vanilla extract 
3 large eggs 
2 cups fresh blueberries 
3 cups all-purpose flour, scant 
1 1/2 teaspoons baking powder

Frosting  
8 ounces cream cheese, room temperature (1 block) 
1/2 cup unsalted butter, room temperature 
1 teaspoon finely grated lemon zest 
1 teaspoon vanilla extract 
juice from 1/4 lemon 
16 ounces powdered/icing sugar (I used 4-5 cups, I just kept adding sugar until I got the frosting consistency that I wanted)


Preheat the oven to 350 degrees.  Butter a  9 x 13 inch baking pan and line it with parchment paper, allowing the excess paper to hang over the edge of the pan.

Combine the sour cream and baking soda in a small bowl and let stand for 5 minutes.  In a separate bowl whisk together the flour and baking powder, set aside.  Place the blueberries in a separate bowl and toss with a spoonful of the flour mixture, just to coat the berries.


In a large bowl, beat the butter and sugar with an electric mixer until light and creamy.  Add the lemon zest and vanilla and beat until combined.  Beat in the eggs, 1 at a time, then add the sour cream mixture and beat just until combined.

Add the remaining flour mixture to the wet ingredients and mix just until combined.  Gently fold the flour-coated blueberries into the batter, being mindful not to overmix. 

Spoon the batter into the prepared pan and bake for about 45 minutes, until a toothpick inserted in the center comes out clean. Let cool in the pan for about 10 minutes, then carefully remove the cake to a wire rack to cool completely, either by using the parchment paper as handles or by inverting the cake onto a wire rack and then inverting it again.

When the cake is completely cool, frost with cream cheese frosting.  

To make the frosting, beat all of the ingredients except the sugar with an electric mixer until light and fluffy. Gradually mix in the sugar and beat until smooth. Use immediately.


Sunday, March 13, 2011

Fruit & Nut Crisps with Truffled Cream Cheese


Aahhhhhhhh...that's better.  Back from my vacay and feeling great.  I was eager to get back in the kitchen and feeling super ambitious.  The trip was choc-full of amazing, bucket list-fulfilling culinary experiences, but there was little time for cooking.  (See my Favorite Spots page for restaurant ideas in south Florida.)  Guns blazing in the kitchen, I decided to tackle this copy cat recipe that I have had my eye on for a while.  It turns out that these were really easy to make if you have a little time on your hands (they have to be baked twice) and the reward is well worth it.  A perfect snack or offering for guests.  These sweet/savoury crisps are amazing with tangy cheeses.  This Truffled Cream Cheese was the perfect accompaniment.  A quick mix of cream cheese and sour cream with chives and truffle oil.  Really good!  Now, back to reality.


Fruit & Nut Crisps
Origin: This Genius

Notes:  This is a copy cat recipe of a popular artisan cracker.  I found the recipe here, it was really well done, producing a close match to the original.  I used my favorite fruits, nuts and seeds, you can feel free to do some substitutions.

Ingredients:
2 cups flour
2 teaspoons baking soda
1/2 teaspoon salt
2 cups buttermilk
1/4 cup brown sugar
1/4 cup honey
1 cup dried, sweetened cranberries
1/2 cup chopped pecans
1/2 cup roasted pumpkin seeds
1/4 cup sesame seeds
1/4 cup flax seed, ground
1 tablespoon chopped fresh rosemary

Preheat the oven to 350 degrees.

In a large bowl, whisk together the flour, baking soda and salt.

Add the buttermilk, sugar and honey and stir a little, just to incorporate.  Add the remaining nuts, seeds, fruit and herbs and stir until just blended.  Do not over mix.

Pour the batter into 2 lightly greased loaf pans.  Bake for about 35 minutes, until they are golden brown and they spring back when pressed lightly.  Remove from the pans and cool completely on a wire rack.  You can freeze one loaf at this point.  Or you can leave the loaves until the next day to proceed with the next step if you'd like.

When ready to continue, preheat the oven to 300 degrees.  With a serrated knife, cut the loaves into the thinnest slices possible.  Not more than 1/4 inch thick.  Lay the slices on an ungreased cookie sheet and bake for 15 minutes,  flip the crackers over and continue to bake for another 10-15 minutes until deeply golden and crispy.

Makes about 8 dozen.


Truffled Cream Cheese

Notes:  I used light cream cheese and sour cream this time around and it was still delicious.

Ingredients:

1 8 oz package cream cheese, room temperature
1/2 cup sour cream
sea salt and freshly ground pepper
2 tablespoons finely chopped chives
a few drops of truffle oil (I used about 12 drops)

Mix together the cream cheese and sour cream until there are no lumps.  You can use a mixer for this.  Season with salt and pepper and fold in the chives.  Add a few drops of truffle oil at a time to taste.  Serve with crackers or crostini.

Makes approximately 1 cup.


Wednesday, February 2, 2011

Horseradish & Aged Cheddar Dip


I consider myself lucky that my Hubby is not into team sports.  I don't lose him every Sunday for football or every Saturday night for Hockey Night in Canada.  He does keeps busy with a love of cars, rap music and outdoor recreation but his Superbowl would be something more like a Barret Jackson Auto Auction or BET Spring Bling.  This Sunday afternoon he'll likely be cross country skiing in the woods, not in front of the TV.  However, I wholeheartedly support the Superbowl because it brings people together to forget about the real world for a while.  It's a very food-centric event and who doesn't love the commercials and half time show.  This recipe would be a great addition to a Superbowl menu, it's a party dip with a smidgen of sophistication.  It's still a mayo laden dip, but it has sharp, aged cheddar, horseradish, and crunchy little radish bits.  It's lovely.


Aged Cheddar & Horseradish Dip
Origin: Adapted from Gourmet

Notes:  You can play around with adding a little sour cream instead of some of the mayo if you'd like to lighten it up a bit.  But who are we kidding here...the main ingredients are cheese and mayonnaise.  You won't be able to eat it all yourself if you make it for guests.  You can add adjust the horseradish level to your taste.


Ingredients:

2 cups coarsely grated extra sharp white Cheddar
1 1/2 cups finely chopped radish
1 cup mayonnaise
3 - 4 tablespoons horseradish
3 tablespoons finely chopped fresh parsley
2 tablespoons Dijon mustard
salt and pepper

Combine all the ingredients in a medium bowl, stir to combine.  Season with salt and pepper.  Serve with pita chips.


Tuesday, January 18, 2011

Truffle Popcorn


My husband is a huge truffle fan.  After a trip to Miami where he was spoiled with freshly imported truffles from Italy he has a taste for them that he just can't shake.  Truffle oil is a great way to give him a little taste of that experience now and then.  A drizzle over mushroom soup or scrambled eggs with aged cheddar and chives or infused into freshly popped popcorn.  This light, salty snack has a whisper of truffle flavour that elevates it beyond movie watching fare (although it does add a little romance to at home movie watching).  This is a great thing to have in your repertoire for last minute guests.  You can have these ingredients in your pantry and bust them out whenever you need them.  A very simple, elegant but fun snack.


Truffle Popcorn
Origin: Unknown

Notes:  Below I have provided guidelines for making truffle popcorn.  The quantities you should use will depend on the size of your pot, how much popcorn you want to make and the quality and strength of your truffle oil.  Typically, the more expensive the oil, the more truffle it contains and the stronger the flavour.  Truffle salt enhances the final truffle flavour but it is excellent with regular salt and pepper too.

Ingredients:

vegetable oil (sunflower, safflower, canola etc.)
truffle oil
popcorn kernels
truffle salt (or fine sea salt, or regular table salt)
freshly ground black pepper

Choose a heavy bottom pot with a tight fitting lid for making your popcorn.  Pour equal parts (my preference) vegetable oil and truffle oil in your pot, just enough to coat the bottom (no more than 1/4 inch of oil).  You can omit the vegetable oil for a more intense truffle flavour, or if you have an inexpensive truffle oil do not dilute it with vegetable oil.

Heat the oil over medium high heat and add 2-3 corn kernels to the pot.  When you hear one of the kernels pop, your oil is ready.

Add enough popcorn kernels to fully cover the bottom of the pot in a single layer.  Cover the pot with a lid.  When the popcorn starts popping vigorously, shake the pan several times to ensure the kernels are all getting coated in the hot oil and that nothing is sticking to the bottom of the pot.  When the popping slows to 2-3 seconds between pops, remove from heat completely.

Pour popcorn into a bowl and add a generous amount of salt and pepper.  Toss to coat.  Serve immediately.


Wednesday, December 22, 2010

Chipotle & Rosemary Spiced Nuts


I am still in full-on holiday baking mode.  There are more parties and dinners to attend so my mind continues to flip through the old mental recipe box in search of great host gifts and party snacks.  But my usually strong, almost never failing, annoyingly present sweet tooth has given out on me early.  I can't take any more cookies or candy.  This is a good time to bust out some spicy mixed nuts (with just a little sweet).  I have made this recipe at least five times since my beloved Barefoot Contessa, Ina Garten, released her latest cookbook, How Easy is That?: Fabulous Recipes & Easy Tips.  Remember I gushed about Ina a while back?  She is the bomb people.  Approachable recipes, smiling face, amazing food of all kinds.  You can't go wrong with her recipes.  These nuts are easy, as in How Easy is That?.  Just throw some ingredients on a baking sheet, toss and bake.  The hardest part is trying not to loose any precious nuts on the floor when stirring.


Chipotle & Rosemary Spiced Nuts
Origin: Ina Garten

Notes:  Chipotle Chile Powder is made of ground, dried, smoked jalapenos.  I'm starting to see it popping up everywhere, you shouldn't have trouble finding it.  Even this company, which seems to be available in every grocery store across Canada, has offered it up as a new release.


Ingredients:

Vegetable oil
3 cups whole roasted unsalted cashews
2 cups whole walnut halves
2 cups whole pecan halves
1/2 cup whole almonds
1/3 cup pure maple syrup
1/4 cup light brown sugar, packed
3 tablespoons freshly squeezed orange juice (1 orange should do it)
2 teaspoons ground chipotle powder
4 tablespoons minced fresh rosemary leaves, divided
Kosher salt

Preheat the oven to 350 degrees.

Brush a baking sheet generously with vegetable oil. Combine the cashews, walnuts, pecans, almonds, 2 tablespoons of vegetable oil, maple syrup, brown sugar, orange juice, and chipotle powder on the baking sheet and toss to coat the nuts evenly.  Add 2 tablespoons of the rosemary and 2 teaspoons of salt and toss again.

Spread the nuts in one layer and roast for 25 minutes, stirring twice with a large metal spatula while baking.  The nuts should be glazed, golden brown and fragrant.  Remove from the oven and sprinkle with 2 more teaspoons of salt and the remaining 2 tablespoons of rosemary.  Toss well and set aside at room temperature, stirring occasionally to prevent sticking as they cool.

Serve warm or cool completely and store in an airtight container at room temperature.


Tuesday, December 14, 2010

Jalapeno Popper Dip


Anyone out there looking for an easy, last minute appetizer for a holiday party?  Yeah, thought there might be a couple of you.  This dip is a cinch to put together and people go crazy for this stuff!  It tastes just like jalapeno poppers!  If you are a fan of those crispy, cheesy, spicy poppers, you'll love this dip.  All the spicy jalapenos and creamy cheeses are in the base of the dip, and the topping, made with crispy panko bread crumbs, provides the taste and crunch of the crispy popper coating.  It's fiery and sinfully delicious!


Jalapeno Popper Dip
Origin: Unknown

Notes:  I always divide my dip into to two small baking dishes.  I spread a slightly thinner layer of dip in each of my dishes, then top them using double the amount of breadcrumbs.  This provides a great dip-to-crispy topping ratio and I end up with two dips for serving on two separate occasions.  Just cover one unbaked dip and store in the fridge until you need it.  One is often enough for a small gathering.  If you are having a large gathering you can use this same method and place the two dips in different locations around your event.

Ingredients:

1 8oz package of cream cheese
1/2 cup mayonnaise (1/2 fat is fine here)
1/2 cup grated, medium cheddar cheese
1/2 cup grated Parmesan cheese
1 small jar of pickled jalapenos
1 small tin of green chilis

1/4 cup panko breadcrumbs (I use 1/2 cup, see note above)
1/4 cup finely grated Parmesan cheese (I use 1/2 cup, see note above)

Preheat oven to 400 degrees.

In the bowl of a food processor, combine the cream cheese, mayonnaise, cheeses, jalapenos (with most of the  juice/brine) and chilis.  Pulse until well chopped and combined.

Combine panko breadcrumbs and remaining Parmesan cheese in a small bowl and mix thoroughly.

Pour dip into an 8 inch baking dish (or any 2 slightly smaller baking dishes).  Top with an even layer of breadcrumb mixture.  Bake for 15 minutes, or until the sides are bubbling and the top is golden brown.

Serve with tortilla chips for dipping.


Thursday, November 25, 2010

Roasted Beet Pizza


Okay, bear with me here.  These photos aren't great, in fact I'm afraid to show you what the whole pizza looked like.  I had a bugger of a time getting it off the (floured AND cornmealed) counter.  I still haven't bought that pizza peel I've been thinking about.  It would have made things a lot easier and prettier.  Another problem with these photos is that you can't see that those gorgeous, roasted, golden beets are nestled between a layer of salty feta cheese and savoury thinly sliced shallots.  Oh!  And then the whole thing is drizzled with honey.  It's amazing.  I couldn't hold out until the next time I made this recipe to take a better picture.  I had to get the word out there now, just in case there was a chance that even one of you would make this for an upcoming holiday party.


Roasted Beet Pizza
Origin: Cooking Light Magazine

Notes:  I strongly suggest you buy a pizza stone if you bake a lot of pizza or flatbreads at home.  You can even buy premade, uncooked pizza dough, and the pizza stone will take it over the top, giving you a crunchy, chewy, bubbly, charred finished product.  They are great.  I have included some links for pizza dough recipes below.  I experiment with a new one every time I make pizza and I haven't committed to one yet.  The toppings are the star here, so you can't go wrong with the dough.  And as I mentioned, feel free to buy premade but uncooked dough.  I sometimes buy portions of uncooked frozen pizza dough from my local grocery store, it's found in a freezer in the bakery section (with frozen desserts and breads).


Ingredients:

1-2 golden beets
uncooked pizza dough, enough for a 10 inch pizza
1  teaspoon olive oil
1/2  cup crumbled feta cheese
1/4  cup thinly sliced shallots
1/4  teaspoon  kosher salt
1  teaspoon  honey

Preheat oven to 450 degrees.

Prepare beets, leave the root and 1 inch of the stem intact, scrub clean with a brush.  Wrap beets in foil (I drizzle a little olive oil over the beets and season them with salt and pepper before roasting).  Bake for 40-60 minutes or until tender.  Remove from oven and cool.  Trim ends and peel the skin off of the beets, slice thinly.

Increase oven temperature to 500 degrees.  Position an oven rack in the lowest position.  Place a pizza stone on lowest rack and preheat pizza stone for 30 minutes before baking pizza.

Prepare your dough.  Roll, push, pull, toss or prod the dough into a 10-12 inch circle (or square, or rectangle...).  Gently brush oil over pizza dough.  Arrange cheese, beet slices, and shallots evenly over dough, leaving a 1/2 inch border. Slide dough onto preheated pizza stone, using a spatula as a guide, (this is where I ran into trouble.  If you don't have a pizza peel, I would suggest rolling your dough and preparing all of your toppings, and when you are ready to bake, put the bare pizza dough onto the hot pizza stone and then very quickly and carefully put your toppings on).

Bake at 500° for 8 minutes or until crust is golden. Remove from pizza stone. Sprinkle with salt, and drizzle with honey. Cut into wedges.


Pizza Dough Recipe Links

Cooking Light Magazine's Basic Pizza Dough (from this recipe)
Jim Lahey's No Knead Pizza Dough
Smitten Kitchen's Really Simple Pizza Dough
101 Cookbooks' Best Pizza Dough Ever Recipe


Thursday, November 18, 2010

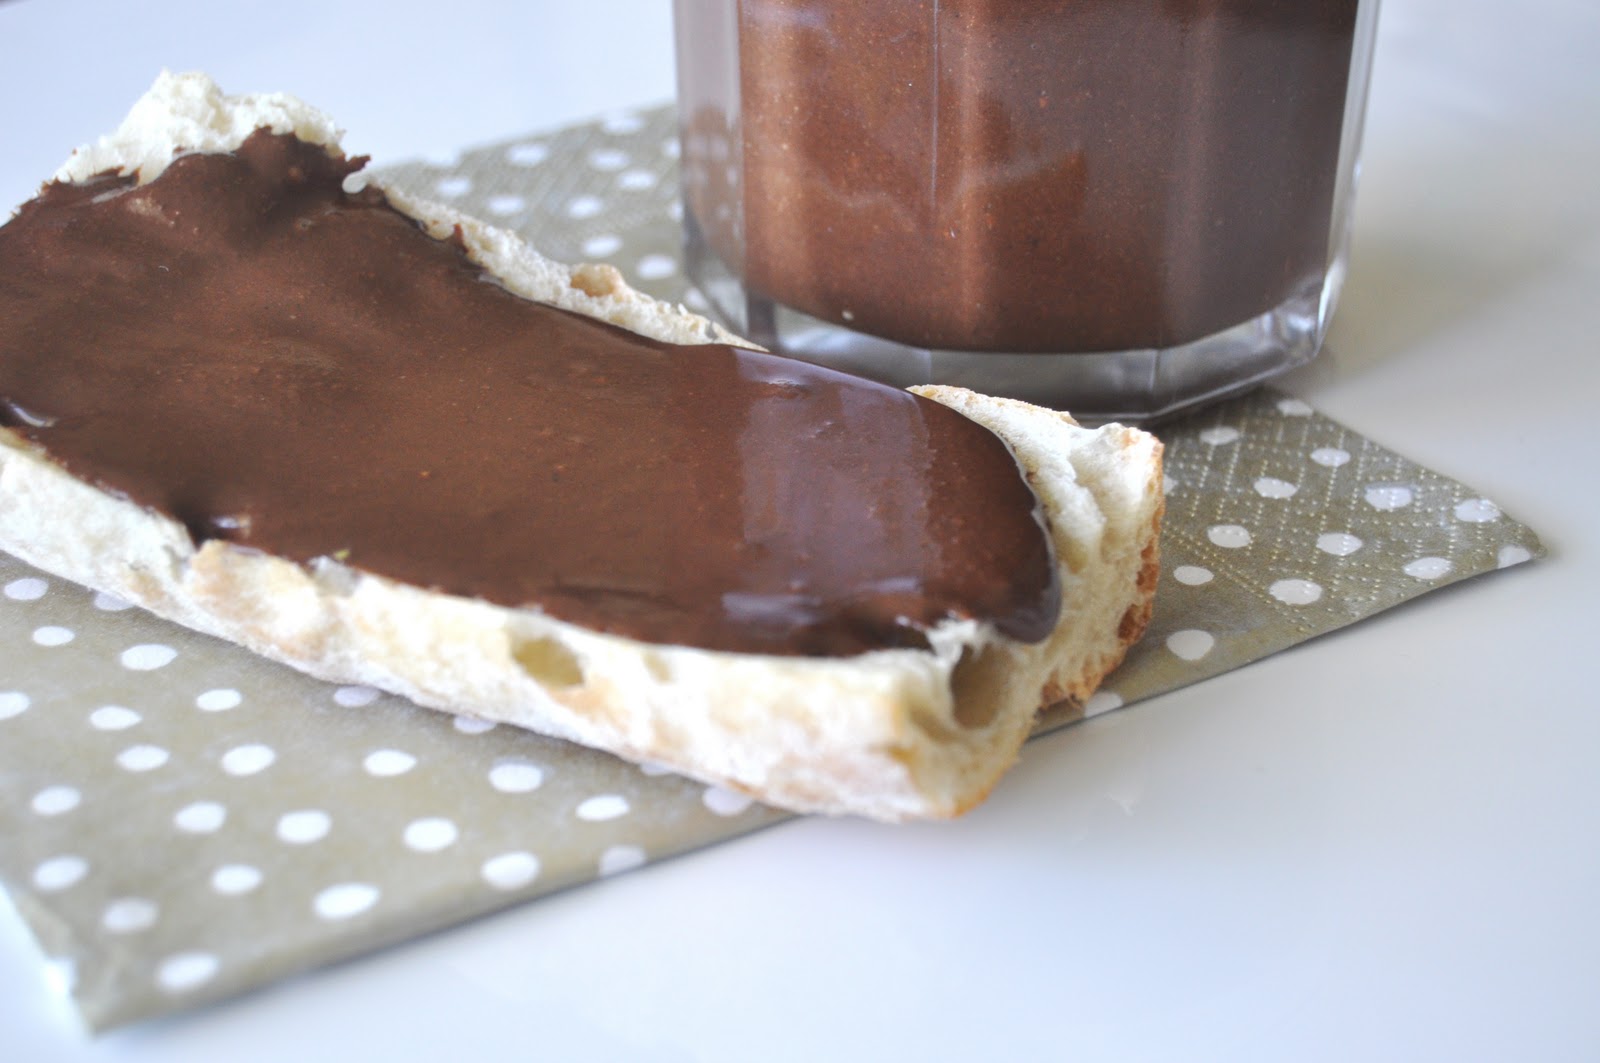
Superior Sandwich: Homemade Nutella


So, those Nutella Scones got me thinking...as much as I looove Nutella, I have always been concerned by the quantity and choice of oil used in the product.  The label used to list hydrogenated vegetable oil as the second ingredient.  I believe over the last little while they've changed that to palm oil, which I suppose is great progress.  But still, there is more oil than hazelnuts in that little jar.  I couldn't help but think that homemade is always best and I knew I could do better.  Boy, did I, and with hazelnuts proudly featured as the first ingredient.  Nutty, chocolaty, sweet bliss.  I better not make a habit out of this.


Homemade Nutella
Origin: Impeccable Taste by Jaime

Notes:  The only down side to this recipe (besides its habit forming properties) is that hazelnuts cost a fortune, so get ready for sticker shock when you hit the checkout with your bag of nuts.  I was not able to achieve the ultra smooth consistency of the original Nutella, it was a tad grainy but the fresh flavour more than makes up for that.

Ingredients:

2 cups hazelnuts
1 1/2 cups icing sugar (powdered sugar)
1/2 cup good quality unsweetened cocoa powder
1/2 teaspoon salt
1 tablespoon pure vanilla extract
1/4 cup coconut oil, warmed/melted

Heat oven to 350 degrees.

Place hazelnuts on a baking sheet and toast in the oven for 7-10 minutes, or until they become fragrant.  Place toasted hazelnuts in a clean tea towel and rub the skins off as much as you can.  (I spent waaaay too long trying to get perfectly naked hazelnuts, they are very stubborn, just try your best and move on.)

Place cooled hazelnuts in the bowl of a food processor.  Process until smooth.  The hazelnuts will go through phases while processing.  They will become chopped, then they will all clump together, keep going...eventually the heat generated from the friction of the processor will loosen the ground nuts.  Keep processing until you achieve a smooth paste.

Add the icing sugar, cocoa powder, salt and vanilla, process until combined.

With the processor on, slowly drizzle the liquid coconut oil through the feed hole.  Process until smooth.


Monday, November 8, 2010

Homemade Ricotta


Don't judge, but I am on a total high from this weekend.  One that comes from a combination of feeling like a pioneer woman, living off the land, making my own cheese and from knowing the possibilities that lie ahead after trying this new technique and tasting the results.  What an incredible discovery!  I didn't realize how easy this would be, or how delicious the outcome would be.  It took two women I adore, Ina Garten and Gwyneth Paltrow, joining forces to get me to try making my own ricotta cheese.  I love these ladies, Ina because she is an all knowing, friendly, food goddess with a never ending supply of foolproof recipes.  Gwyneth I love because she is a total foodie (have you seen her TV series Spain...On the Road Again with Mario Batali and Mark Bittman? Awesome!), she is a beautiful Mom with an amazing fashion sense, she is married to Chris Martin and their best friends are Jay-Z and Beyonce, she has a booming career with an upcoming appearance on Glee, and I totally love her GOOP lifestyle website - which is where I found this recipe.  And that is what this is really about.  Also included in this post is a simple and delicious way to use your fresh homemade ricotta cheese (also from Ina/GOOP).  Add fresh herbs and flavourings to make a simple but tasty topping for crostini.  You can and should however, use this cheese for any recipe that calls for ricotta from this day forward, forever and ever, Amen.


 colander lined with cheesecloth, sitting in a large bowl

 bringing the milk, cream and salt to a boil

 curdled milk after adding the vinegar

milky mixture draining through cheesecloth


Homemade Ricotta
Origin: Ina Garten via Goop

Notes:  For best results, use the best quality organic milk and cream you can find.

Ingredients:

4 cups whole milk
2 cups heavy cream
1 teaspoon kosher salt
3 tablespoons good white wine vinegar

Set a large sieve/colander over a deep bowl.  Dampen 2 layers of cheesecloth with water and line the sieve/colander with the cheesecloth.

Pour the milk and cream into a large, heavy bottomed pot.  Stir in the salt.  Bring to a full boil over medium heat, stirring occasionally.  Turn off the heat and stir in the vinegar.  Allow the mixture to stand for 1 minute until it curdles.  It will separate into thick parts (the curds) and milky parts (the whey).

Pour the mixture into your prepared cheesecloth and allow it to drain into the bowl at room temperature for about 20 minutes.  Occasionally discard the liquid that collects in the bowl.  The longer you let the mixture drain, the thicker the ricotta will be.  Transfer the ricotta to a bowl, discard the cheesecloth and any remaining whey. Use immediately or cover with plastic wrap and refrigerate.  The ricotta will keep refrigerated for 4 to 5 days.


Herbed Ricotta Crostini
Origin: Adapted from Ina Garten via Goop

Ingredients:

2 cups ricotta cheese
4 scallions/green onions thinly sliced
2 tablespoons fresh mint, chopped
2 tablespoons fresh parsley, chopped
2 tablespoons good quality extra virgin olive oil
salt and pepper
1 crusty loaf of bread or baguette (Ciabatta is great)
additional olive oil

In a medium bowl combine, ricotta, scallions, mint, parsley and 2 tablespoons olive oil, season with salt and pepper and mix.

Preheat oven to 400 degrees.   Slice your bread into 1/2 inch slices and lay on a baking sheet.  Drizzle the bread slices with a little olive oil.  Bake for about 10 minutes or until just slightly browned and crispy.

Spread toasted bread slices with herbed ricotta mixture and serve.

Friday, October 22, 2010

Maple Granola Brittle


This is a new recipe for me.  I knew I'd be into it.  I am a big fan of both maple granola and any kind of brittle (although I recently saw a blog post about Fritos Corn Chip Brittle - not sure about that one).  It makes perfect sense to combine these two favorites.  It becomes a portable, super decadent granola...like the type you know you shouldn't be eating for breakfast.   I repeat...you should not be eating this for breakfast.  There is a ton of sugar and maple syrup in this recipe which makes it so decadent but the subtle orange flavour helps maintain the taste of granola.


Maple Granola Brittle

Notes:  You need a candy thermometer and some parchment paper for this recipe.  The original recipe said to line your baking sheet with a silicone mat before laying down the hot brittle...I used parchment paper for this and it was fine.  My sunflower seeds tasted a little stale so I omitted them and increased the amount of almonds and pecans.  You can play around with the nuts/seeds/oats combination as long as the total amount is the same in the end.

Ingredients:
1 cup old-fashioned rolled oats 
1/2 cup whole almonds
1/2 cup pecans
1/2 cup shelled sunflower seeds
1/2 cup roasted pumpkin seeds
1 teaspoon freshly grated orange zest 
1 cup packed light brown sugar 
1/2 cup pure maple syrup 
1/2 cup fresh orange juice 
1/4 teaspoon salt 
1/4 cup cold unsalted butter, softened

Preheat oven to 350 degrees and place oven rack in the middle position.

Spread oats, almonds, pecans, and sunflower seeds in an even layer in a large baking sheet and bake, stirring occasionally, until oats are pale golden, about 15 minutes. Transfer to a bowl and toss with pumpkin seeds and orange zest.

Line a baking sheet with nonstick liner (or parchment paper). 

Cook brown sugar, syrup, juice, and salt in a 4 to 6 quart heavy saucepan over moderately high heat, stirring with a wooden spoon (be careful not to splash or splatter while stirring; mixture will become extremely hot), until it registers 290°F on thermometer, about 8 to 10 minutes. Stir in butter until melted (mixture will thicken and become opaque), then quickly add nut mixture and stir until coated well. Immediately pour onto liner (baking sheet with parchment), then cover mixture with a sheet of parchment paper. 

Roll out brittle as thin as possible with a rolling pin (I ended up pulling the parchment paper and the brittle off of the baking tray and rolling it between the two sheets of parchment directly on my counter). Carefully peel off  top layer of parchment paper and discard.

Cool to room temperature, about 30 minutes. Break brittle into large pieces.


Thursday, September 16, 2010

Dukkah


I’ve been fixated on food blogs for more than a few years now.  First it was food TV, then I discovered food magazines followed by food magazine websites...and then came food blogs.  This was my path to enlightenment.  Since discovering this life changing tool known as the food blog I’ve been trolling the internet, clicking on links, searching endlessly for those precious few blogs that keep me coming back for more. Those blogs that just get me…like we have the same taste.   
101 Cookbooks was the first blog that really blew my mind, it got me hooked.  I trust the authors of the blogs I love, and if they say something is fantastic...well, I just have to try it.  So when the author, Heidi Swanson said make Dukkah, I made Dukkah. It's a Middle Eastern mixture of toasted and ground, nuts, spices and seeds.  The idea is to take bread, dip it in olive oil and then into the Dukkah so it adheres.  The warm, spicy but not fiery mixture is intensely flavoured with a little crunch.  The flavours are surprising and addictive.  There are probably a million different versions of Dukkah, this is the first and only one I have tried.  I don't want to mess with something so good.


Dukkah
Origin: 101 Cookbooks, from this book

Notes:  I always double this recipe when I make it.  It lasts in an airtight container for up to a month.  I store mine in a mason jar in the fridge.  It is a great appetizer or snack with pita bread or a crusty loaf dipped in olive oil.  It would be a great addition to a Middle eastern platter with Hummus, Tabbouleh and pita.  Or you can use Dukkah for other things like crusting chicken or maybe a warm crusted goat cheese round.  The spice list might seem intimidating to some, but if you have a bulk spice resource (such as Bulk Barn around these parts) you can get it all in one spot.  I have a plastic container that I keep specifically for my little bags of Dukkah spices and nuts which I just pull it out when I want to make it.

Ingredients:

1/2 cup hazelnuts
1/4 cup coriander seeds
3 tablespoons sesame seeds
2 tablespoons cumin seeds
1 tablespoon black peppercorns
1 teaspoon fennel seeds
1 teaspoon dried mint leaves
1 teaspoon salt

Heat a heavy bottom, medium sized skillet over medium-high heat.  Toast each ingredient separately (except for mint and salt), tossing it around in the skillet for a couple minutes or until fragrant, taking care not to burn anything.  After toasting each ingredient one at a time, transfer to your food processor or a mortar and pestle to cool completely.  Once cooled, add mint and salt and pulse or crush until coarsely chopped.  Be careful not to turn the mixture into a paste, it should be like coarse sand with small pebbles.

Sunday, September 12, 2010

Salted Butter Break-Ups


It's a lazy, gloomy Sunday afternoon here.  My neighbor has his fireplace going and the air smells like Fall.  I don't see myself leaving the house today...not that I mind one bit, I love dreary days like this.  I have time to bum around the kitchen and discover new snacks.  With a hot cup of jo, this new leisurely, homey cookie was a perfect foil to the day, wrapped up in crispy, salty/sweet bite.


This recipe for Salted Butter Break-Ups is from Dorie Greenspan's new cookbook,  Around My French Table:More Than 300 Recipes from My Home to Yours.  After flipping through this new book excitedly, I didn't know where to start.  Today I saw this one at Lottie and Doof and it looked so perfect for a laid back afternoon like this.


Salted Butter Break-Ups
Origin: Around My French Table, Dorie Greenspan

Notes:  This recipe came together really quickly in the food processor.  I needed all 5 tablespoons of water to get my dough to a good consistency.  The dough should be well chilled and you need to use the wax paper when rolling it out as it is really sticky.  The wax paper helps you transfer the dough to the parchment lined baking tray easily.  Do not skip the egg yolk glaze.

Ingredients:
1 3/4 cups flour
2/3 cup sugar
1 teaspoon sea salt or kosher salt
9 tablespoon cold, unsalted butter, cut into 18 pieces
3-5 tablespoons cold water
1 egg yolk (glaze)

In a food processor, combine the flour, sugar, and salt. Pulse them to combine. Add the butter and pulse until the mixture looks like coarse meal with pea-sized pieces and small flakes. With the machine running, add the cold water gradually, just until the dough almost forms a balls. It should be malleable.

Scrape the dough out onto a large piece of plastic wrap. Form it into s flat square by folding up the sides of the plastic wrap and patting down the dough. Wrap completely and refrigerate for at least one hour and up to 3 days.

Preheat oven to 375 degrees. Line a baking sheet with parchment paper or a silicone mat.

When ready to bake, unwrap the chilled dough and roll it out between large pieces of wax paper (I used 2 pieces overlapped on both the top and bottom) Roll to a thickness of 1/4 inch into any shape that will fit in the baking pan. Using the bottom piece of wax paper transfer the dough to the baking sheet. Brush the dough with the egg wash. Using the tines of a fork, mark a crosshatch pattern into the dough.

Bake the cookie for 30-40 (I did 35 minutes) minutes or until golden brown and it springs back slightly when pressed in the center. Cool the large cookie completely on a cooling rack. Break up the cookie as you wish.

Tuesday, August 10, 2010

Spiced Broccoli and Cheddar Cake


I sit here, writing this post and I am sure my Hubby is downstairs devouring what's left of this broccoli cake.  I haven't seen him in a while and it's just too quiet down there.  I don't blame him though.  It is the perfect snack.  Hauntingly spicy, savory cake, studded with cheddar and perfectly cooked broccoli.  It would great as a part of a brunch or lunch menu too.


Spiced Broccoli and Cheddar Cake
Inspired by the NY Times article about French Cakes Sales


Notes:  Make sure to leave a couple of inches on your broccoli stalks.  You want to tuck the broccoli into the batter and have it go throughout.  The cake is best the day it is baked but try it toasted if it has dried out a bit by day two or three.


Ingredients: 


1 3/4 cups cake and pastry flour (can use all-purpose)
2 tsp baking powder
1 tsp curry powder
1 tsp turmeric
1 tsp sea salt
1/4 tsp black pepper
3 large eggs
1/3 cup milk
1/3 cup olive oil
2 cups cheddar cheese, shredded
2 cup of broccoli florets


Preheat oven to 350 degrees.  Butter a loaf pan.

Whisk together the flour, baking powder, spices, salt and pepper.

Whisk eggs, milk and olive oil in a separate bowl.

Fold the wet ingredients into the dry until just combined.  Fold in 1 1/2 cups of the cheese.  Transfer the batter to prepared pan.  Insert broccoli stems (florets on top)  into the batter,  pushing them towards the bottom of the pan.  Sprinkle remaining cheese on top.

Bake for 30 to 40 minutes or until a cake tester inserted (into the cakey parts) comes out clean.  Cool for 5 to 10 minutes then run a knife around the edge of the cake to release it and turn the loaf out onto a cooling rack.  Once cooled for at lest 30 minutes, cut into slices with a serrated knife.  Slices can be cut in half for appetizers.  Serve warm or at room temperature.

Makes 1 loaf.