Showing posts with label Salad. Show all posts

Thursday, September 1, 2011

Peach & Watercress Salad


Peaches, much like strawberries, have an amazing ability to swing both ways.  From dinner to dessert that is.  They make a mean pie and are equally at home in a salsa or on the grill along side a steak.  This dish marries the sweet peaches with savoury salad fixins and a healthy, happy union ensues.  We got crisp, cool romaine lettuce and cucumbers, juicy peaches and bitter, peppery watercress all tossed in a pungent, shallot studded balsamic vinaigrette.  All I'm trying to say is, peaches too, make a bangin' salad


Peach & Watercress Salad
Origin: Jaime, Impeccable Taste

Notes:  Please, I urge you, if you are a lover of dairy, dot this salad with crumbled goat cheese.  It will be a fantastic addition.  Toasted, slivered almonds are also great with this combo.

Ingredients:

Salad
1 head romaine lettuce, chopped into 1 inch strips
4 Lebanese cucumbers or 1 English (seedless) cucumber, chopped into bite sized pieces
4 large, ripe but firm peaches, sliced
1 bunch watercress, trimmed, leaves and tender stalks only

Dressing
1/4 balsamic vinegar
1 teaspoon Dijon mustard
1 teaspoon honey
1/4 cup olive oil
2 tablespoons shallots, finely chopped
salt and pepper

Prepare the dressing.  In a small bowl, whisk together the balsamic vinegar, Dijon, honey and a pinch of salt and pepper.  Slowly drizzle in the olive oil, whisking constantly to emulsify.  Add the chopped shallots, stir and let stand at least 10 minutes before serving, or cover and refrigerate until ready to use.

Prepare the Salad.  In a large serving/salad bowl, layer the romaine lettuce, cucumber, peaches then watercress.  Drizzle with dressing, toss and serve immediately.  Serves 4.


Thursday, August 11, 2011

Roasted Sweet Potato Salad


What would happen if a whole summer whizzed by completely potato salad free?  It hurts to even think about, it just wouldn't be right.  I was determined to come up with an alternative for all of us white potato avoiders.  I knew I could make this happen with the nutritionally dense sweet potato, as long as there were enough savoury, tangy and creamy ingredients to balance out the sweet.  A healthy dose of onion, pickles, chopped egg, and celery did the trick!  With all of those delicious flavours mingling together, it's quite the summer party.


Roasted Sweet Potato Salad
Origin: Jaime, Impeccable Taste

Notes:  To keep things paleo friendly, I make my own mayonnaise, avoiding sugar and unhealthy vegetable oils.  I have included my recipe for homemade, olive oil mayonnaise below.  Obviously, good quality store bought mayo works great here (I like Hellman's)I have incorporated instructions on how to roast sweet potatoes into this recipe.  Everyone has their own method for this.  I have found that preheating the baking sheets helps them crisp up pretty well.  You can roast the potatoes however you like, you just need to start with well roasted, bite sized chunks of sweet potato for this salad.


Ingredients:

4 pounds sweet potatoes, unpeeled and scrubbed clean
1/2 cup coconut oil (or any vegetable oil), divided
salt and pepper

5 hard boiled eggs, peeled and chopped
1 bunch green onions, finely sliced (about 1 cup)
4 large dill pickles, chopped (about 1 1/2 cups)
4 celery stalks, finely chopped (about 1 cup)
3/4 cup mayonnaise
2 tablespoons Dijon mustard
salt and pepper

To roast the sweet potatoes, preheat oven to 475 degrees, place oven racks in the middle and lower positions.  Insert 2 baking sheets to preheat along with the oven.  Heat coconut oil in a small saucepan until just melted/liquified.  Chop the sweet potatoes by halving them lengthwise, then cut the halves lengthwise into 2 or 3 pieces, chop wedges into bite sized pieces (about 1/2 inch thick).  In a large bowl, toss the potatoes with 4 tablespoons of oil and a generous sprinkle of salt and pepper.  When the oven and baking sheets are preheated, carefully remove the baking sheets and drizzle 2 tablespoons of oil onto each sheet.  Carefully distribute the sweet potatoes between the 2 baking sheets in a single layer, and pop them back in the oven.  Roast for about 15 minutes, then flip the potatoes with a spatula, and put the trays back into the oven, rotating the 2 sheets top to bottom.  The potatoes should be done after an additional 10 minutes of roasting.  I like to put each sheet under the broiler for a couple of minutes to get some nice brown crispy spots.  Remove potatoes and cool completely.

To prepare the salad, combine the mayo and Dijon mustard in a small bowl.  Toss the cooled sweet potatoes, eggs, onions, pickles, celery and mayo mixture together in a large bowl.  Season with salt and pepper, chill and serve.


Homemade Olive Oil Mayonnaise
Origin: Jaime, Impeccable Taste

Notes:  This mayo can be made with a food processor or by hand with a very strong arm.  I use light or extra light olive oil for this recipe to keep the flavour neutral.  The mayonnaise made in the food proccessor will be more stiff then that made by hand, but it's worth it to save time and your arm.

Ingredients:

2 egg yolks, preferably room temperature
1 teaspoon Dijon mustard
2 teaspoons lemon juice
3/4 teaspoon salt
1 1/4 cups light (not extra virgin or first pressing) olive oil

Food processor method:  Put the egg yolks, Dijon, lemon juice and salt in the bowl of a food processor fitted with the steel blade.  Measure out your olive oil.  Process the egg and seasonings for about 30 seconds until lightened and thickened slightly.  Keep the motor running and using a teaspoon (it helps control the speed at which you add your oil), drizzle oil SLOWLY, teaspoon by teaspoon, drip by drip, through the feed tube of the food processor.  After you have added about 1/2 cup, you should see a thick mayonnaise forming, you can now increase the speed at which you add the remainder of the oil, still using the teaspoon to drizzle in a slow, steady stream.  Stop processing immediately after you have finished adding your oil or it may separate. (Use your ears, you can actually hear a change in the sound of of the mayonnaise as it loosens before it separates. Stop processing immediately if you hear this!) Chill until ready to use.

By hand:  Dampen a tea towel, fold it, and place it under a medium sized mixing bowl (this will keep the bowl steady when whisking like a mad person).  Measure out your olive oil.  Place egg yolks, Dijon, lemon juice and salt in the mixing bowl, whisk vigorously until pale and slightly thickened, about 30 seconds.  While whisking continuously, using a teaspoon, VERY SLOWLY drip the olive oil into the egg yolk mixture.  By VERY SLOWLY I mean it should take you about 4 minutes to add the first 1/4 cup of olive oil.  Once the first 1/4 cup of olive oil has been added, you should see the mayo starting to emulsify.  You can increase the speed at which you add your oil now, still using the teaspoon to drizzle in a slow, steady stream.  It should take you an additional 4-5 minutes to add the rest of the oil.  Do not over mix or the mayo may separate.  Chill until ready to use.

If your mayo separates:  Have no fear!  It can always be rescued.  Get your arm ready, it's going to take some more elbow grease.  Start with one egg yolk in a medium, clean bowl.  Whisk the egg yolk vigorously for about 30 seconds, until it has lightened in colour.  Slowly add your separated mayonnaise, drip by drip into the new bowl, whisking continuously.  This should bring the mayo back to a smooth, creamy consistency.

Thursday, July 7, 2011

Bloody Mary Tomato Salad


I spotted this recipe on Smitten Kitchen the other day and within 2 hours I was eating it for dinner.  Smitten Kitchen is my all time favorite food blog and I try many of Deb's recipe recommendations.  But when she starts talking Bloody Marys, I move fast.  You see, Bloody Marys are a bit of a thing in my family.  My Nanny loved them, and always added a secret ingredient - pickle juice!  As long as I can remember my Mom has ordered at least one, without fail, every time we dine out.  I adore them anytime, especially with brunch (my Hubby too!).  And my younger sister?  Well, she may have caught the Bloody Mary bug worst of all, ordering doubles every time we are out.  Geez, I guess we all sound like a bunch of lushes...but it's in our blood, it can't be helped.  I always have the classic Bloody Mary ingredients on hand so I sprung into action and recreated this Bloody Mary Tomato Salad.  All of the complex Bloody Mary flavour is there, without the booze of course, and it goes amazingly well with a good steak.


*I have to mention, in Canada, we do not drink Bloody Marys at all.  It's this odd little variation on the Bloody Mary that has become a classic Canadian cocktail and a family favorite...the Caesar!  The ingredients and taste are virtually the same, substituting Clamato juice for Tomato juice...tomato juice with a hint of clam juice!!  It's essentially the same drink, but I guess we Canuks should really call this a Caesar Salad.  Ha!

Bloody Mary Tomato Salad
Origin: Bon Appetit via Smitten Kitchen

Notes:  The original recipe pairs this salad with a nicely seasoned flank steak.  I had 2 bone-in rib steaks in the fridge so I went with those.

Ingredients:

1 cup red onion, finely chopped
3 tablespoons Sherry vinegar, divided
2 pounds cherry or grape tomatoes, halved (3 pints or 3-10 ounce containers)
1 cup celery hearts, chopped (light coloured inner stalks and leaves)
1/2 cup brined green olives, finely chopped, plus 2 tablespoons olive brine
2 tablespoons prepared horseradish
1 tablespoon Worcestershire sauce
1 teaspoon hot pepper sauce (Tabasco)
1/2 teaspoon celery seeds
1/4 cup extra virgin olive oil
salt and freshly ground black pepper


Place the chopped onion in a large bowl, pour 1 tablespoon sherry vinegar over onions and let them sit for 10 minutes, stirring occasionally (this will temper the onion's bite).  Add tomatoes, celery and olives to the onions.

To make the dressing, whisk remaining 2 tablespoons vinegar, reserved olive brine, horseradish, Worcestershire, pepper sauce and celery seeds in a small bowl. Slowly drizzle in olive oil, whisking constantly to emulsify.

Pour the dressing over the tomato salad and toss to coat. Season with salt and pepper to taste. Set aside until needed, or cover and refrigerate for up to 4 hours.  Serves 8-10.


Wednesday, June 29, 2011

Arugula Salad with Strawberries


I just can't get enough of these gorgeous strawberries!  Gotta get my daily fix...they are like crack to a semi-strict clean eater like me!  Not only do they make a great snack and have countless uses in luscious desserts...they have savoury applications too and they make a bangin' salad.  This is another old favorite that fits seamlessly into our Paleo diet lifestyle.  Sliced strawberries take a little soak in some balsamic vinegar which sweetens and intensifies their flavour.  Then the strawberry magic is tossed with peppery arugula, toasty pecans and a simple balsamic vinaigrette.


Arugula Salad with Strawberries

Notes:  We enjoyed this with a simple steak on the BBQ and the 2 of us polished off the salad.  Double the amounts below to feed 4-6 people.  This salad shines extra bright when a part of a breakfast or brunch spread.

Ingredients: 

1/2 pint strawberries, rinsed, hulled, and quartered (I used about a cup, sliced)
2 tablespoons balsamic vinegar, divided
2 tablespoons olive oil
1/4 teaspoon salt
1/4 teaspoon pepper
2 bunches arugula, washed, dried, and trimmed (I used half of a 5oz container of organic baby arugula)
1/2 cup toasted pecan halves, roughly chopped

In a large bowl, toss strawberries with 1 tablespoon balsamic vinegar, let sit 5 to 10 minutes.

In a small bowl, whisk together remaining tablespoon balsamic vinegar with the olive oil and salt and pepper.

To the strawberries, add vinaigrette, arugula, and toasted pecans. Toss to combine, and serve immediately.


Monday, June 13, 2011

Chipotle Steak with Brussels Sprout Slaw


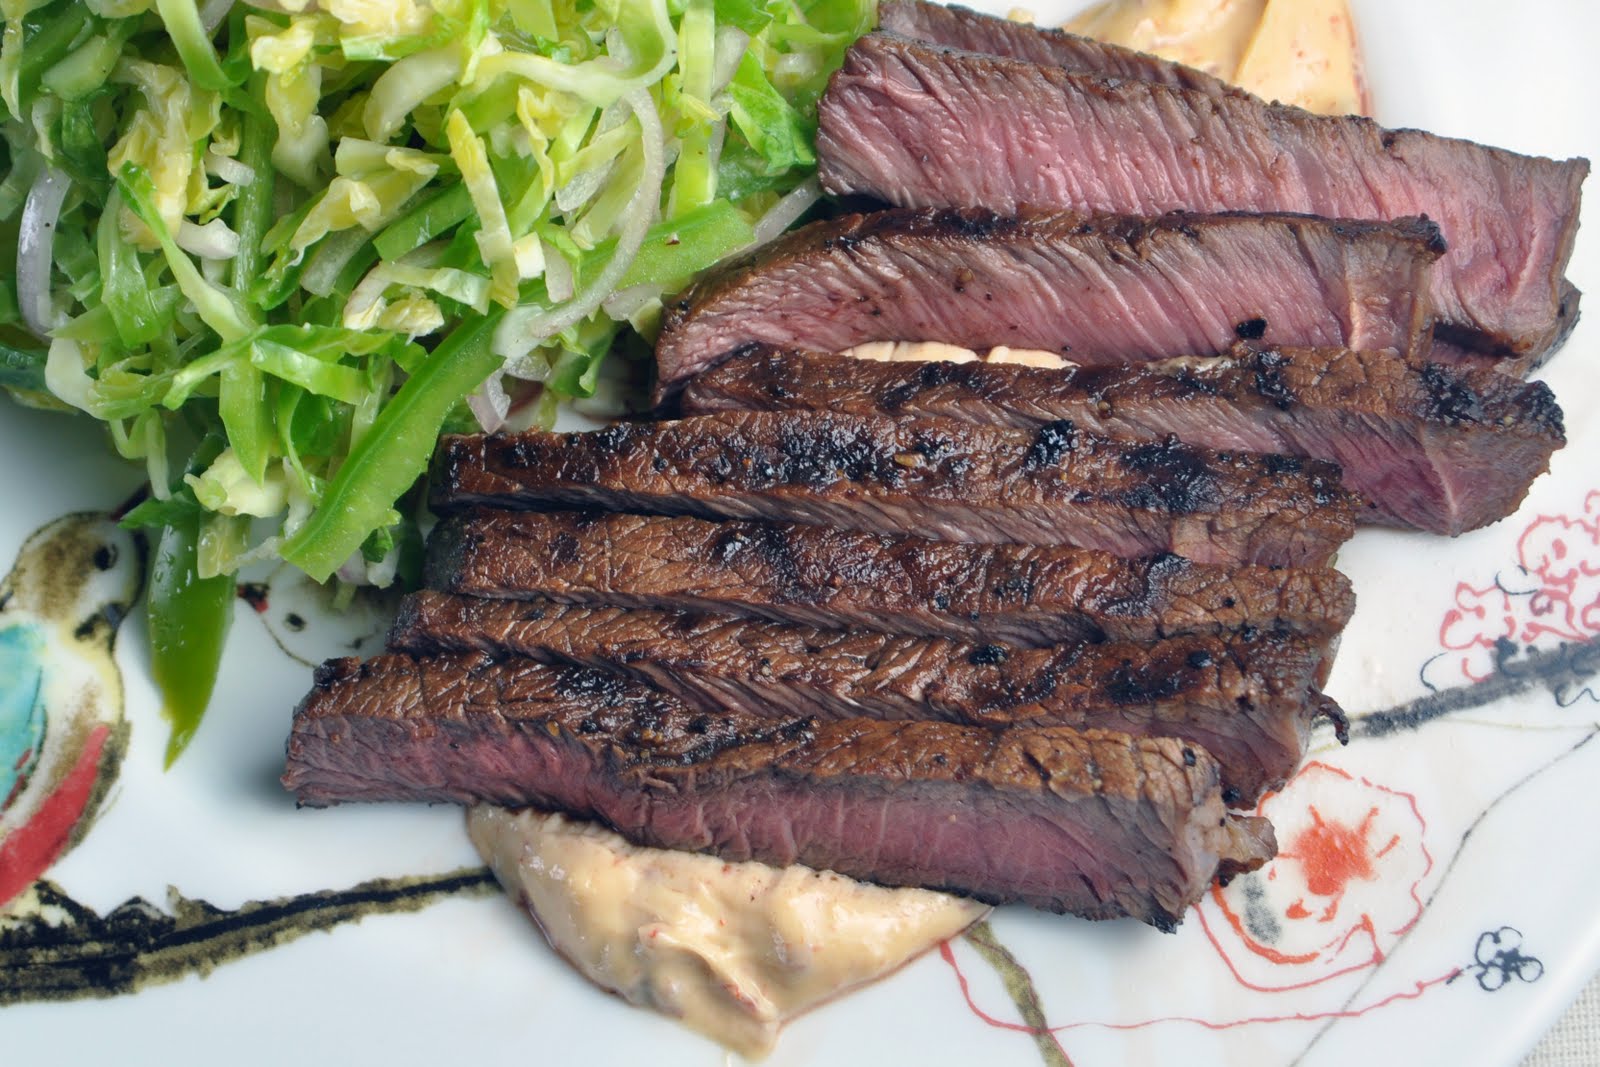
This is a meal I have been wanting to recreate for a while now.  It's an attempt (a successful one!) at a fabulous dish I had at a favorite local restaurant, Allium, on one of their tapas nights.  The sadly small (but appropriate for tapas) portion size left me wanting more, I couldn't get this dish out of my head.  Robust, smoky chipotle flat iron steak with creamy chipotle aioli, accompannied by a light, grassy brussels sprout slaw.  It was great!  I did a very decent job with my copycat recipe.  I finally got my fill of this great dish!  Try it out...or visit Allium for the real thing!


Chipotle Flat Iron Steak
Origin: Inspired by Chef Arup Jana, Allium

Notes:  Allium used "flat iron steak" for this dish, my cut of beef was called an "inside blade steak", I believe both are from the shoulder, just cut slightly different.

Ingredients:

2 chipotle peppers, finely chopped (from a can of chipotles in adobo sauce)
1 teaspoon adobo sauce
3 tablespoons balsamic vinegar
3 tablespoons olive oil
salt and freshly ground black pepper
upto 2 lbs beef steak, flat iron or blade steak

Mix the chipotle peppers, adobo sauce, balsamic vinegar and olive oil in a glass baking dish or a resealable plastic bag large enough to hold your beef.  Add steaks and toss to coat, marinate for about an hour (or more if desired).

When you are ready to grill, remove steaks from marinade, sprinkle with salt and pepper and grill.  This a tougher cut of meat so medium (even medium-rare) doneness is ideal.  Make sure to get a good sear on the meat but don't cook it too long.  We grilled it on high heat for about 4-5 minutes per side.


Chipotle Aioli
Origin: Inspired by Chef Arup Jana, Allium

Notes:  You can adjust the amount of chipotle pepper to control the heat to your liking.

Ingredients:

1/2 cup mayonnaise (I make my own olive oil based mayo)
1 chipotle pepper, finely chopped (from a can of chipotles in adobo sauce)
1/2 teaspoon adobo sauce
1 small clove garlic, minced
salt

In a small bowl, combine the mayo, chipotle, adobo sauce and garlic.  Season with salt.  Refrigerate until ready to use.


Brussels Sprout Slaw
Origin: Inspired by Chef Arup Jana, Allium 

Notes:  This slaw is really good!  Forget everything you think you know about brussels sprouts.  The raw, shredded brussels sprouts are surprisingly mild with a nice crunch.

Ingredients:

brussels sprouts, about 5 cups shredded
1 green pepper, sliced as thin as possible
4 shallots, halved and sliced as thin as possible
4 tablespoons cider vinegar
4 tablespoons extra virgin olive oil
salt and freshly ground pepper

To prepare the brussels sprouts, trim the end slightly and slice them in half lengthwise.  Starting at the top of the brussels sprout, thinly slice them, stopping when you get the the core/hard bits. 

In a large bowl combine the shredded brussels sprouts, sliced green pepper and shallots.  Drizzle with the vinegar and olive oil, season with a generous amount of salt and pepper and toss to combine.  Serve immediately or chill for an hour before serving.  Serves 4.


Wednesday, May 25, 2011

Kofta Burgers


This past weekend marked the unofficial start to summer in Canada with our Victoria Day long weekend.  The time has finally come for cottaging, gardening, boating and BBQs!  These burgers are outstanding and would be a hit at any summertime event.  Taking cues from my recent trip, I took one of my favorite Israeli meals, the kebab, and changed it up a bit to fit right in at a North American cottage or backyard party.  In Israel, Kofta kebabs are usually made of ground lamb or beef, mixed with spices and then formed into logs around skewers.  The kebabs are grilled over open coals and served with rice, pita and an assortment of small salads, sauces and pickled things.  These all beef Kofta Burgers are loaded with the same fresh flavours and lots of spice, they are juicy and delicious.  Served with tahini sauce and fresh, bright tasting salads, all stuffed into a pita, they are superb!


Kofta Burgers
Origin: Jaime, Impeccable Taste

Notes:  These burgers are delish!  I have included recipes for some great accompaniments, but you could simplify things by serving them with pita bread and classic burger toppings like lettuce, tomato, pickle and onion.  BUT...the tahini sauce is an absolute must!!

Ingredients:

Burgers:
2 lbs ground beef (I use 1/2 lean and 1/2 medium ground beef)
1 large onion, roughly chopped
4-5 cloves of garlic, roughly chopped
l handful parsley, large stems removed
1 handful cilantro, large stems removed
4 tablespoons garam masala (a blend of spices, you can purchase it or make your own)

For Serving:
Tahini Sauce (recipe below)
Simple Spring Salad (recipe below)
Onion Pomegranate Salad (recipe below)
pita bread

In a food processor, pulse together the onion, garlic and herbs until finely chopped and combined.

In a large bowl combine the ground beef, onion/herb mixture, garam masala and a pinch of salt.  With your hands, mix everything together thoroughly.  Cover and chill the mixture for an hour or until ready to use.  Form the meat mixture into patties.  Indenting the middle of each patty with your thumb will help the burgers cook evenly and keep them from shrinking up into balls once they hit the grill.

Grill the patties to your liking.  We usually grill them over medium heat for about 7 minutes per side.  It depends on your grill, the thickness of the burgers and how well you like them cooked.

Serve the Kofta Burgers with pita bread, tahini sauce and salads. 

**The burger patties are great without the pita too, just serve with salad and tahini sauce for a paleo friendly meal.


Simple Spring Salad
Origin: Jaime, Impeccable Taste

Notes:  The lemony greens and crunch of the radishes and cucumbers are great stuffed into a pita with the Kofta Burgers.

Ingredients:

6 cups crunchy baby greens, I used baby Red Leaf and Green Leaf lettuces (regular Romaine would be fine)
4-6 small Lebanese cucumbers, sliced into thin rounds (or use an English/seedless cucumber)
1 bunch radishes, sliced into thin rounds
1 lemon, juiced
1/4 cup extra virgin olive oil
salt and freshly ground pepper

In a large bowl combine the lettuce, cucumbers and radishes.

Just before serving, add lemon juice, olive oil, some salt and A LOT of freshly ground pepper.  Toss and serve.


Tahini Sauce
Origin: Classic Middle Eastern Recipe, Jaime, Impeccable Taste

Notes:  This sauce is a must with the Kofta Burgers.

Ingredients:

1 cup pure tahini (ground sesame paste)
1 lemon, juiced
2 tablespoons extra virgin olive oil
2 small cloves garlic, minced
salt
3/4 cup warm water
a handful of fresh parsley, large stems removed (optional)


In the bowl of a food processor, combine tahini, lemon juice, olive oil, garlic and salt (start with 1/4 teaspoon and add more to taste).  Pulse to combine.  Add the warm water and process until smooth (you can add more warm water as necessary to achieve desired consistency).  Add parsley and pulse to chop/combine. 

This can be made without a food processor.  Mix everything by hand (chop your parsley first).  But note that it may take a while to achieve a smooth consistency as the tahini and lemon juice will seize up.  The warm water will help loosen the mixture.


Onion & Pomegranate Salad
 Origin: Adapted from The Food of Israel, Sherry Ansky & Nelli Sheffer

Notes:  This salad takes these Kofta Burgers over the top!  It acts like a relish or a salsa, adding flavour, sweetness and crunch.  To de-seed your pomegranate, in a bowl of water, submerge chunks of the pomegranate and release seeds into water.  The seeds will sink and the white, pithy stuff will float, and your hands will stay clean!

Ingredients:
1 large red onion, halved and thinly sliced
1/2 cup chopped fresh mint
1/2 cup chopped fresh parsley
1 cup pomegranate seeds
juice of 1/2 lemon
3 tablespoons extra virgin olive oil

Place sliced onions in a strainer over a bowl and sprinkle them with about 1/2 teaspoon of sea salt.  Let stand for 1 hour, tossing occasionally.  The onions will release much of their bitterness as their juices drip into the bowl below.  Squeeze out any excess juice.  I usually give the onions a quick rinse to remove excess salt and then press them into the strainer to remove liquid.

In a medium bowl, combine the onions, herbs, pomegranate seeds, lemon juice and olive oil.  Toss gently, check for seasoning, adding salt if necessary.


Wednesday, May 18, 2011

Tomato & Walnut Salad


Anybody still out there?  I'm back and ready to party...well, ready to do some cooking at least.  My absence started sadly, with the passing of my beloved Nanny.  But ended happily with a crazy trip through Israel with my In-laws.  See...I've been busy.  I just returned from the middle east with an even deeper love of its cuisine.  Wonderful salads, kabobs of all varieties, olives, fresh fruit and dried, the freshest nuts and seeds...all naturally delicious, whole foods that fit in perfectly with our new diet.  While it was hard to resist the Falafel, Israel's national dish, there were plenty of other options to feast on.  I managed to drag my jet lagged butt to the kitchen yesterday to start recreating one of the many dishes I loved while I was away.  While travelling, I scribbled many notes, tried to decipher dishes and even asked waiters to ask chefs for clues to help prepare the most outstanding meals.  This salad was part of a typical Israeli breakfast we enjoyed on a Kibbutz in the north.  I've been mulling over the possible ingredients and I think I broke the code.  It is as good as I remember.  So simple, flavouful and healthful. 


Tomato & Walnut Salad
Origin: Inspired by Kibbutz Kfar Blum

Notes:  Simple dishes like this shine when the best ingredients are used.  Use juicy, flavourful tomatoes, fresh basil and really good olive oil for best results.  Though I discovered this salad at breakfast, it would also be great along side a burger.


Ingredients:

1 pint cherry tomatoes, halved or quartered
1/2 cup walnuts
1/2 cup basil, loosely packed, torn or roughly chopped
1/4 cup olive oil
2 tablespoons fresh lemon juice
1/2 small clove garlic, minced (just a touch)
1/2 teaspoon sea salt

Toast the walnuts in the oven at 350 degrees for 7-10 minutes (or on the stove, in a frying pan, watching carefully, over medium heat until fragrant and toasted).  Cool the nuts and then chop very coarsely.

Combine all the ingredients in a medium bowl and toss to combine.  Adjust seasoning if necessary, a little more salt or lemon juice for more zing, or a little more olive oil if it's too strong.  Serve immediately.


Wednesday, April 20, 2011

Chicken Paillard with Arugula & Tomato Salad


 A major perk to this whole diet change is that dinner takes much less time to prepare.  Fewer options means fewer decisions to make!  Nah, it hasn't been too hard.  There are tons of options from cuisines around the globe, you've just got to hone your recipe searching skills to suit.  There are no slow grains to cook and many of the fresh, unprocessed foods we are eating require little effort to taste fabulous, the ingredients speak for themselves.  The inspiration for this quick dish comes from Lincoln Road in Miami, it seems like each time I visit, I end up lunching on a patio enjoying this refreshing meal.  It's light and simple and provides the perfect fuel for powering an afternoon of intense shopping in the Miami heat.  Use the highest quality chicken, the juiciest tomatoes and freshest greens for this easy, bright tasting dish.


Chicken Paillard with Tomato & Arugula Salad
Origin: Jaime, Impeccable Taste

Notes:  To pound the chicken, you can place individual chicken breasts in a large resealable plastic bag and pound them with the flat end of a meat tenderizer, or pound them out between two sheets of parchment paper with a heavy rolling pin as I do.  The idea is to thin the chicken out a bit and ensure it is an even thickness throughout.

Ingredients:

Chicken
4 boneless, skinless chicken breasts, pounded thinly
1 lemon, zest and juice
1/4 cup extra virgin olive oil
4 shallots thinly sliced
2 cloves garlic, minced
salt and freshly ground pepper

Salad
6-8 cups baby arugula
1 pint of cherry or grape tomatoes, halved (any variety of good tasting tomato will do)
3 shallots, thinly sliced
2 tablespoons lemon juice
1 tablespoon red wine, white wine or cider vinegar
1/4 cup extra virgin olive oil
salt and freshly ground pepper

In a baking dish (or in whichever vessel you want to marinate the chicken), combine the lemon juice and zest, olive oil, shallots and garlic, season well with salt and pepper.  Add the pounded chicken breast to the marinade and turn to coat.  Cover and set in the fridge for 20-30 minutes.  Take out 5 minutes before cooking.

Meanwhile prepare the salad.  Make the vinaigrette in the bottom of your salad bowl.  Combine the shallots, lemon juice, vinegar and salt and pepper with a whisk, drizzle in the olive oil, whisking to emulsify.  Place the arugula and tomatoes over the vinaigrette, toss just before serving.

To prepare the chicken, heat a large heavy bottomed skillet or frying pan over medium high heat.  Give it a few minutes and make sure it's really hot. Remove the chicken from the marinade and shake off all the shallots.  Add just a teaspoon of olive oil to the hot pan, the oil coating the chicken should be enough.  When the pan is hot, add the chicken, you must hear a good sizzle or the pan is not ready.  Cook the chicken for about 3 minutes per side or until cooked through.  You want the chicken to have a good brown crust on both sides.

Toss the salad and serve with the hot chicken.  Serves 4.

Wednesday, April 13, 2011

Asian Salad with Salmon


I have been making this salmon salad for ages.  It was one of my first great successes cooking from the Everyday Food mag by Martha Stewart.  You may think that I have fallen off of the Whole 30 challenge wagon, with the sounds of this delicious offering.  I'm happy to report that I am 11 days into this thing and this dish happens to fit in comfortably with only 1 ingredient to reconsider...a smidgen of honey, which I replaced lickitty split.  I used a bit of pureed pineapple to fill the role of honey and it worked great.  All of the components in this salad play an important part, and the outcome is fantastic.  Crunchy vegetables, sweet fruit, and toasted almonds topped with chunks of the simplest salmon drizzled in a sweet, tart, sesame vinaigrette.


Asian Salad with Salmon
Origin: Adapted from Everyday Food, Martha Stewart

Notes:  You can substitute different types of fruits and nuts in this salad.  Try chunks of pineapple or mango or cashews in place of the almonds.  I have served this dish as a part both a lunch and brunch spread and I have made it countless times for dinner.  It is really simple and quick.

Ingredients:

2 salmon fillets (about 8 ounces each)
Coarse salt and ground pepper
1/4 cup rice vinegar
3 tablespoons toasted sesame oil
4 tablespoons pineapple puree (or 2 tablespoons honey)
1 small head napa cabbage, shredded (about 6 cups)
1 small head red cabbage, shredded (about 4 cups)
2 large carrots, shredded
1/3 cup finely chopped sweet onion, such as Vidalia
1/2 cup sliced or chopped toasted almonds
1/2 cup coarsely chopped dried apricots


Preheat oven to 425 degrees.  Place salmon fillets on a rimmed baking sheet, rub with a 1/2 teaspoon of sesame oil and season generously with salt and pepper.  Bake fish for 10-15 minutes, turn the broiler on for the last minute or two to brown the tops a bit.  (If your salmon has skin on it, bake it skin side down the entire time, once cooked, remove the salmon leaving the skin behind.  A layer of aluminum foil will make your clean up a lot easier.) The fish can be served warm or room temperature.

While the fish is cooking, in a large bowl, whisk together vinegar, oil, and pineapple puree (or honey), season with salt and pepper. Set aside 2 tablespoons dressing.

To remaining dressing, add napa and red cabbage, carrots, onion, almonds and apricots and toss to coat.

Top the salad with chunks of salmon and drizzle remaining dressing over salmon.  Serves 4.


Friday, April 8, 2011

Spicy Grilled Chicken & Mango Slaw


Challenge!  My husband and I have been given a 30 day challenge to change our eating habits in a major way.  It's pretty drastic, so this blog is going to look a little different in the coming weeks (no more of these or these for a while).  Based on the paleolithic diet, this 30 day plan focuses on clean eating.  It strips away processed foods and aims to reset your digestion and metabolism, curb cravings and promote strength and well being.  It brings us back to caveman times and encourages us to eat from the land.  Meat, fish, healthy fats (like those found in avocados or olive oil), vegetables, fruits and nuts.  Yep, that's it.  Cavemen didn't have the tools to process milk products or grains - so they're out.  If you read between the lines, you might have gathered that my vegetarian Hubby has made a huge change in his diet by taking on this challenge, adding meat and taking out all of his vegetarian staples.  No processed foods or beans means no soy products, which means no fake hot dogs and hamburgers!  The idea of eating meat has been marinating (sorry) inside him for a while now.  This challenge and the promise of feeling great and getting stronger was motivation enough for him to take the plunge after more than 10 years meat free.  This way of eating is meant to accompany a very active lifestyle, there is a large focus on protein of the highest quality to encourage strength building.

So here we go.  No dairy, no legumes, no beans, no grains, no sugar.  But have no fear.  I will not compromise the quality of the recipes I am offering you.  I have spent the last week researching and experimenting and I hope to bring you recipes that are healthy and full of satisfying flavours.  Stuff you would want to make regardless of what it's missing.

Although some of the recipes featured on this blog could be easily modified, looking back through my archives I found only one solitary recipe that fit the bill as is...a side dish, not even a complete meal.  The winner?  Roasted Cauliflower with Tahini Sauce.  I obviously have work to do!  If you'd like to check out the challenge, here is the info.


The


Without further ado, on to the recipes.  I'm off to an easy start.  I had no problem scarfing down these great dishes.  The mango slaw is probably my favorite mango salad ever, and I have had my share of 'em.  There is no soy or fish sauce (which contains sugar!) only tart lime juice and vinegar, balanced by a touch of oil, salt and spicy red pepper flakes.  I love the addition of mint in lieu of cilantro and cashews instead of peanuts...which works perfectly because peanuts are not on the menu as there are considered a legume and not a nut.  The chicken is a super versatile, easy dish that you can turn to anytime.  It can be grilled or roasted in the oven and you can use any part of the bird that you fancy.  Made with simple things that I always have on hand.  It hits all the right notes and is pure juicy goodness.


Spicy Grilled Chicken
Origin: adapted slightly from NY Times, Suvir Saran

Notes:  I have made this several times using just thighs or a mixture of thighs and breasts.  I have roasted it in the oven and grilled it on the BBQ, it always turns out great.  Its not too spicy and it's an easy recipe that will please whomever you are feeding.


Ingredients:
8 chicken thighs (or 4 thighs and 2 breasts), with skin, pierced all over with a small knife
5 cloves garlic, minced
1 2-inch piece fresh ginger root, grated or minced
1 small jalapeƱo pepper, seeded and finely chopped
Juice and zest of 1 whole lemon
2 tablespoons tomato paste
1/2 teaspoon salt, or to taste
1 teaspoon cumin powder
1 teaspoon coriander seeds or ground coriander

Place all of the ingredients in a resealable plastic bag and toss, squish, rub or smoosh everything around to coat thoroughly.  Refrigerate until ready to use, up to 24 hours.

Preheat your grill on high, (or preheat oven to 400 degrees).   If grilling, turn down grill to about medium and grill skin side down first, for about 25 minutes, turning once.  If roasting, put chicken, skin side up, in a roasting pan. Roast for 25 to 30 minutes or until done and the juices run clear.


Mango Slaw with Cashews & Mint
Origin: Smitten Kitchen

Notes:  This recipe is easily halved but I use the full 1/4 cup of mint and cashews because I'm baaaad!  A slightly firm, but ripe mango is best for this salad.  Deb at Smitten Kitchen has an amazing Thai-Style Chicken Legs recipe that goes perfectly with this slaw, but for the 30 day challenge, the spicy chicken recipe above does the trick.

Ingredients:  
2 mangoes, peeled, pitted and julienned
1 to pound Napa cabbage, halved and sliced very thinly (savoy works too, sliced as thin as possible)
1 red pepper, thinly sliced
1/2 red onion, thinly sliced
6 tablespoons of fresh lime juice, from about two limes
1/4 cup rice vinegar (I use apple cider vinegar during my 30 day challenge)
2 tablespoons oil of your choice (I used grapeseed)
1/2 teaspoon salt
1/4 teaspoon red pepper flakes, or to taste (or omit this and whisk in a chile paste to taste)
1/4 cup thinly sliced fresh mint leaves
1/4 cup toasted cashews, coarsely chopped


Thursday, March 31, 2011

Curried Cauliflower & Chickpea Salad


This was a new one for me.  Cauliflower and chickpeas are a common duo in Indian cuisine occurring often in rich stews and curries, but this is something else entirely.  A salad loaded with Indian spices and ingredients, but it remains bright and light tasting. It was a pleasure to eat with its playful colours, different textures and vivid flavour.  Bold yellow, turmeric scented cauliflower, crisp apple and fennel, flavourful cilantro and red onion, and chickpeas and little bits of naan bread to soak up the light curry-lime vinaigrette.  It was a nice change, a great at-work lunch and it kept well in the fridge for a couple of days.


Curried Cauliflower & Chickpea Salad
Origin: BBC Food, Simon Rimmer

Notes:  I loved the addition of the bits of naan bread.  Next time I might toast it first so that the bread holds up better for the leftovers.  I could not find watercress so I subbed baby arugula in its place.

Ingredients:

Salad
1 cauliflower, cut into florets
4 cups vegetable stock, or water and vegetable stock cubes/powder
1 tablespoon turmeric powder
1 19 oz can chickpeas, drained and rinsed
1/2 red onion, thinly sliced
1 apple, thinly sliced
1/2 fennel bulb, thinly sliced
1 tablespoon fresh cilantro, chopped (I used at least 2 tablespoons)
1 handful watercress (or baby arugula leaves)
salt and freshly ground black pepper

Dressing 
1 tablespoon red curry paste (I used 1 1/2 tablespoons)
1 tablespoon malt vinegar 
juice of 1 lime (about 3 tablespoons)
1/4 cup vegetable oil
1 naan bread, torn or cut into pieces

Bring the vegetable stock and turmeric to boil in a medium pot.  Boil the cauliflower for one minute.  Drain and set aside to cool.

For the dressing, mix the curry paste with 3 tablespoons of hot water until smooth then whisk in the vinegar, lime juice and vegetable oil in a steady stream until emulsified.  Season with salt and freshly ground black pepper.

Mix the cauliflower, chickpeas, onion, apple, fennel, cilantro and watercress (or arugula) in a bowl, then stir in the dressing until well combined. Season with salt and freshly ground black pepper.

Mix the pieces of naan bread through the salad and serve.


Friday, March 25, 2011

Grilled Vegetables with Walnut & White Bean Puree


I don't know what drew me to this recipe in the first place.  It's not the most inspiring sounding thing, and it's not that pretty (really hard to get a flattering picture).  But it called out to me and I tried it.  Instantly it became one of my favorite meals.  I could eat solely this for dinner (and did last night), and then eat it for lunch the next day (got it in tow), and the day after that (looking forward to it).  It is really satisfying and wholesome.  The grilled vegetables are doused in a garlicky balsamic dressing and then tossed with fresh mint.  Enjoyed with the creamy, nutty, albeit ugly puree, it's a real sensation with me.


Grilled Vegetables with Walnut & White Bean Puree
Origin: Adapted slightly from StoneSoup

Notes: During the long winter months I use a grill pan to grill the vegetables.  It is so easy, especially for the onions as nothing falls through the grill.  I grill the peppers first, then grill the onions, then the zucchini and add each vegetable to the dressing as they are cooked.

Ingredients:

Grilled Vegetables
4 zucchini, sliced lengthwise into 4 strips
2 red peppers (or yellow/orange), deseeded and sliced into wide strips
2 red onions, sliced into 3/4 inch rounds (or half moons)
3 tablespoons olive oil
2 tablespoons balsamic vinegar
2 tablespoons extra virgin olive oil
1 clove garlic, minced
1 bunch mint, leaves picked and roughly chopped

Walnut & White Bean Puree
200g walnuts (I use about 2 cups)
1 400g can cannellini beans (or white kidney beans), drained and rinsed (I use a 19oz can)
2 cloves garlic, peeled and roughly chopped
3 tablespoons sherry vinegar or red wine vinegar
4 tablespoons extra virgin olive oil
4 tablespoons water, or to taste
pita bread for serving (optional)

To make the vegetables, preheat a BBQ or grill pan. Toss the vegetables with 3 tablespoons of olive oil and season well with salt and pepper. BBQ vegetables over a high heat until each is cooked to your liking. 
Meanwhile, whisk together the balsamic vinegar, garlic and extra virgin olive oil in a large bowl and season with a little salt and pepper.  As each vegetable is cooked add it to the dressing bowl. When all vegetables are cooked, toss gently and allow to stand for a few minutes to soak up the dressing. Toss through the mint leaves.

To make the Walnut & White Bean Puree, process the walnuts in a food processor until finely ground. Add remaining ingredients except water and continue to whiz until you have a smooth paste. Gradually add water until the puree is smooth and the consistency is to your liking. Season well with salt and pepper.

Serve the grilled vegetables with dollops of the puree and serve with some pita bread (if using).  Serves 4.


Friday, January 21, 2011

Raw Kale and Bread Salad


This is to make up for the last recipe I posted.  A nice healthy one to keep people on track.  I don't want to be responsible for anyone breaking their New Year's resolutions.  Just ignore yesterday's pretty little bars...maybe you'll cross paths with them again one day as you browse the recipe index.  This recipe is for those who resolve to eat more leafy greens this year.  A super way to get them in, you won't be able to stop eating this.  It's like an intense Caesar salad...everything is jacked up a bit.  Solid, hearty greens, lots of garlic and Parmesan and bright lemon flavour.  The crunchy bread soaks up all those flavours and it's all very satisfying.  It makes a great meal with a couple of fried eggs or some roasted chicken.


Kale and Bread Salad
Origin: Adapted from Melissa Clark

Notes:  This salad is really good the next day too.  The kale softens up but it still has a  great texture...not like soggy lettuce.  The softened bread is still good too.

Ingredients:

Dressing
juice of 1 lemon
1 small clove of garlic, minced
salt and freshly ground pepper
pinch of dried crushed chilis
1/3 cup olive oil
1/2 cup finely grated Parmesan cheese

Salad
1 big bunch of kale
1/2 baguette (day old is good)
finely grated Parmesan cheese

Preheat the oven to 375 degrees.  Tear the baguette into bite sized pieces and place them on a baking sheet.  Bake for 10 minutes, or until lightly brown and very crisp.

In a large bowl combine the lemon juice, garlic, 1/2 teaspoon of salt, some black pepper and the dried chilis.  Whisk in the olive oil until emulsified.  Whisk in the Parmesan cheese.

Prepare the kale by removing the the stalks and thick ribs, leaving only the leafy green parts.  Cut the greens into 1/2 inch thick ribbons.  Add the kale to the bowl with the vinaigrette.  Top with additional Parmesan cheese and the toasted bread and toss really well, making sure the Parmesan is evenly distributed and the kale is thoroughly coated with dressing.  You can add more olive oil at any point if the dressing is too pungent for your taste.