Thursday, September 30, 2010

Almond Biscotti


I used to think biscotti was a waste of time and calories.  I'd have a nibble if it came free with my cup of coffee, but I'd never purchase or bake it on my own accord.  When I saw this recipe I was compelled to try it because it brought up memories that I just can't shake, of some Italian orange/almond cookies I had once from a bakery in Toronto.  I thought about those cookies for a year after trying them and searched the internet for a clue as to what they were with no promising results.  This recipe had the flavours I longed for, it had great reviews and they were Italian to boot.  I had to give them a go.  And boy, I'm glad I did...and so were my coworkers.  The flavour is so satisfying with a crunchy crumbly texture..they are pretty special cookies.
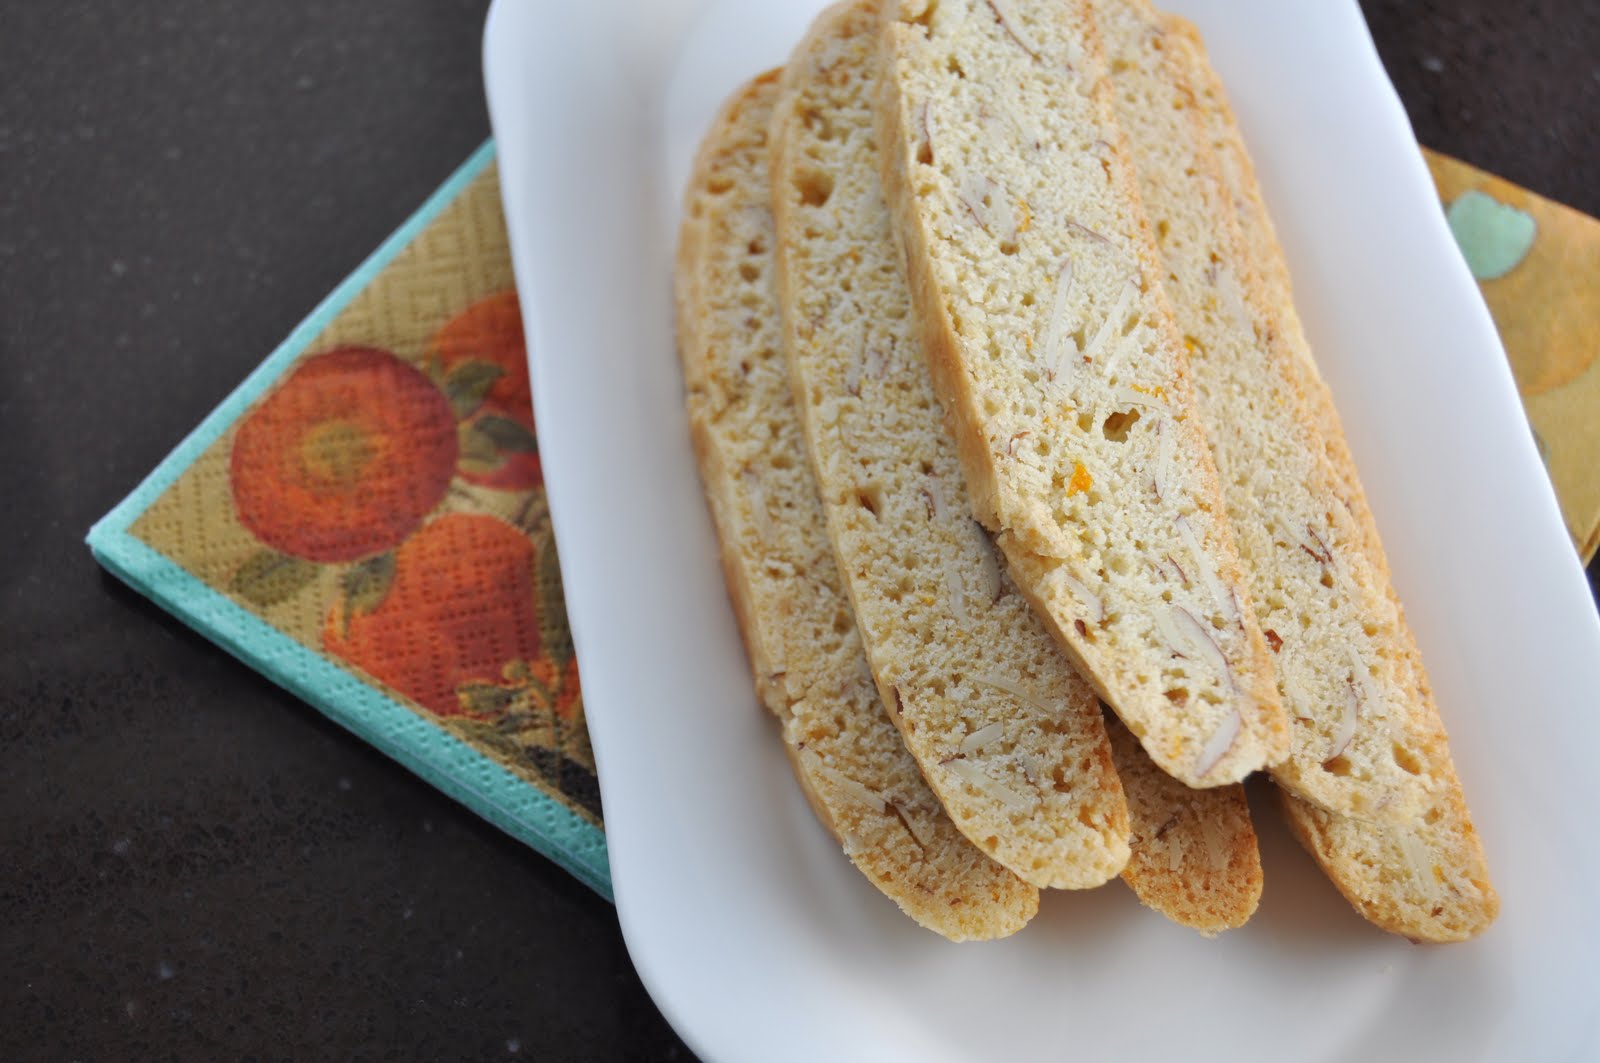


Almond Biscotti
Origin: Smitten Kitchen (adapted from this recipe)

Notes:  These cookies should keep well for at least a week in an airtight container.  Despite the double bake time, these cookies were easy to make and came together quickly with amazing results.

Ingredients:

3 1/4 cups all purpose flour
1 tablespoon baking powder
1/3 teaspoon salt
1 1/2 cups sugar
10 tablespoons (1 1/4 sticks) unsalted butter, melted
3 large eggs
1 tablespoon vanilla extract
1 tablespoon orange liqueur (I used Cointreau)
1 tablespoon orange zest
1 cup whole almonds, toasted, coarsely chopped or sliced almonds (I used sliced)
1 large egg white

Preheat oven to 350 degrees and place a rack in the center position.  Line a baking sheet with parchment paper.

In a medium bowl, sift together flour, baking powder and salt.  In a large bowl, mix together sugar, melted butter, 3 eggs, vanilla extract, orange liqueur and zest.  Add flour mixture to egg mixture and stir with a wooden spoon until well blended.  Mix in almonds.

Divide the dough in half.  Using floured hands, shape each dough half into 13 1/2-inch-long, 2 1/2-inch-wide logs. Transfer logs to the prepared baking sheet spaced apart. Whisk egg white in small bowl until foamy and brush over top and sides of each dough log.

Bake logs for about 30 minutes, until golden brown (logs will spread).  Place baking sheet on a cooling rack and cool logs completely, about 25 minutes. Maintain oven temperature.

Transfer logs to work surface and discard the parchment paper.  Using a serrated knife, cut logs on a diagonal into 1/2-inch-wide slices. Arrange slices, cut side down, on the same baking sheet.  Bake for 12 minutes. Turn biscotti over, continue to bake until just beginning to color, about 8 minutes. Transfer to rack and cool.

Makes about 3 dozen.

Tuesday, September 28, 2010

Go To Dinner: Sesame Seared Tuna and Miso-Ginger Slaw


I call this a "go to" dinner not because it's economical, or because I usually have these ingredients on hand (I had to "go to" 2 different places to get them) but because it's relatively easy to prepare, it's insanely delicious and I keep going back to it time after time. I "go to" it for guests all the time, and I "go to" this recipe at least once a month for just my Hubby and I. The Sesame Tuna with Spicy Mayonnaise is a 5 ingredient recipe and only requires 5 minutes of hands on time. The Miso Ginger Slaw takes a strong chopping hand but it is the perfect accompaniment.


 The above bowl of slaw ingredients was around 3 dollars which is great...because those beauties on the right set me back 30 bucks.  Soooo worth it though.


Sesame Seared Tuna with Spicy Mayonnaise

Notes:  You can make either of these recipes separately.  They are both worthy contenders in their own right.  The tuna makes a great cocktail party snack when cut into smaller more cube shaped pieces, a couple of small bites really satisfies (see special instructions below for additional cutting tips).  Don't skip the Spicy Mayonnaise, it is a vital part of this dish.  Sriracha sauce can be found at large grocery stores, usually in the same spot you would find the soy sauce.

Ingredients:

Tuna
1 pound sushi grade tuna, 1 inch thick steaks,the freshest you can get
1/2 cup soy sauce (low sodium is fine here)
1/2 cup sesame seeds
1/4 cup black sesame seeds (all white sesame seeds is fine)
Vegetable oil (I prefer safflower, sunflower or peanut oil for this)


Spicy Mayonnaise
1/2 cup mayonnaise (I recommend Hellman's, light is fine)
2 tablespoons sriracha sauce (more to taste if you like heat)

Place tuna steaks in a shallow glass baking dish or in a large resealable plastic bag.  Add soy sauce and marinate the tuna for 30 minutes turning once after 15 minutes.  Leave the tuna to marinate outside of the fridge, if the tuna comes to room temperature before cooking it will not be cold in the center after the brief cooking time.

To prepare the Spicy Mayonnaise, combine the mayonnaise and sriracha sauce in a small bowl.  Add more sriracha sauce a teaspoon at a time until you reach your preferred level of spice.

Remove tuna from marinade and pat dry with paper towels.  Place sesame seeds in a shallow bowl or on a plate and mix the two types together (if using).

Heat a frying pan over medium high heat.  Add enough oil to fully coat the bottom of the pan, make sure the oil and the pan are hot (you can throw a sesame seed into the pan and if it sizzles, your pan should be ready).  Working quickly, dredge the tuna pieces in the sesame seeds, turn to coat and lightly press the seeds into the tuna.  Add tuna to the pan and sear for 1-2 minutes per side, depending on the thickness.  You want the white sesame seeds to turn a golden colour and a crust to form (watch out this may spatter and it may create some smoke, but it will all be over in a minute).  The tuna is meant to be served rare inside but you can cook it for an additional minute or two per side if you prefer.

Slice the tuna into 1/2-3/4 inch thick slices and serve with the Spicy Mayonnaise.

Special Instructions
If you want to serve the tuna as a canape type appetizer, ask the fish monger to cut your steaks in 1 1/2 inch slices (careful, these extra thick steaks are pricey) then slice your large steak lengthwise into long 1 1/2" wide strips...into like, a cuboid or rectangular prism shape...ya know?  Sear the large pieces of fish on all 4 long sides.  When ready, slice into 1/2-3/4 inch pieces and top each piece with a small dollop of spicy mayo.


Asian Coleslaw with Miso-Ginger Dressing
Origin: Grace Parisi, Food and Wine


Ingredients:


Dressing
1/4 cup unseasoned rice vinegar
3 tablespoons white (shiro) miso
1 tablespoon mayonnaise
1 tablespoon fresh lemon juice
1 teaspoon finely grated fresh ginger
Pinch of sugar
3/4 cup grapeseed or vegetable oil
Salt and freshly ground pepper

Coleslaw
4 cups shredded green cabbage
2 cups shredded red cabbage
4 medium carrots, shredded
6 radishes, shredded
6 green onions (scallions), white and light green parts only, sliced thinly

Place all the dressing ingredients (except salt and pepper) into a blender and process until smooth.  Season with salt and pepper.

Place all prepared vegetables in a large bowl.  Toss with half of the dressing.  Taste and add more dressing if needed.

Sunday, September 26, 2010

Mediterranean Farro Salad


I fancy myself a bit of a salad aficionado.  When I think salad it's not just leafy greens, a million possibilities come to mind.  My salad repertoire spans a full spectrum, from warm salads to chopped salads.  Today's salad of choice falls into the essential grain salad category.  Usually containing fresh veggies, herbs, hearty nourishing grains and flavourful vinaigrette, this particular breed of salad is extremely satisfying.  Mediterranean Farro Salad is my ultimate workday lunch.  It tastes perfect at room temperature and it provides great energy.


Mediterranean Farro Salad
Origin:  Adapted from, Giada De Laurentiis, Food Network

Notes:  Farro is a whole grain, sometimes called Emmer, it is a close cousin to Spelt.  It has a mild nutty flavour and a hearty chew.  I buy mine at a local Italian grocery store as this grain is commonly grown and eaten in Italy.

Ingredients:

Salad
1 1/2 cups farro (dry)
2 cups water
2 cups vegetable stock
2 cups green beans, cut into 1-2 inch pieces
1/2 cup pitted black olives, roughly chopped
1 medium red pepper, cut into thin strips (about 1 cup) (I used some Hungarian yellow pepper too)
3/4 cup Parmesan, crumbled (I dig into the Parmesan with the tines of a fork and break off small chunks)
1 small bunch chives, cut into 1 inch pieces (about 1/4 cup)

Dressing
1/4 cup sherry vinegar (or red wine vinegar)
1/4 cup extra-virgin olive oil
1 tablespoon Dijon mustard
1 teaspoon freshly ground black pepper

In a medium saucepan, combine the water, vegetable stock and farro.  Bring to a boil over high heat. Cover and simmer over medium-low heat until the farro is tender, about 30 minutes.  Drain farro well and transfer to a large bowl to let cool (or spread grains out on a large plate or baking sheet to cool quickly).

Meanwhile, bring a medium pot of salted water to a boil. Add the green beans and cook for 2 minutes (you can also steam the green beans until crisp tender). Do not overcook the beans.  Transfer the cooked green beans to a bowl of ice water and let cool for 2 minutes. Drain thoroughly.

To make the dressing, whisk together the vinegar, mustard and pepper, slowly drizzle in the olive oil, whisking constantly to emulsify.

Once the farro has cooled, add the green beans, olives, red pepper, Parmesan, chives and dressing. Toss to combine and serve.


Wednesday, September 22, 2010

Baked Feta with Black Olives, Lemon and Thyme


This is merely an introduction to the wonderful world of baked feta.  When baked, the cheese holds its shape but becomes fluffy and spreadable on the inside.  The feta's flavour mellows a bit and it takes on the flavours of whatever you bake it with.  You really can use any toppings your heart or belly desires.  Its wonderful baked with tomatoes, basil and slivers of red onion, or how about mint, green onions and lemon zest.  You can bake it in the oven or even wrap it in foil and throw it on the BBQ.  It can be served as an appetizer with crackers or crostini or it can pass for lunch or dinner with a salad and some crusty bread.  The olives, lemon and thyme together is a flavour combination that I happen to love but feel free to experiment with this to suit your tastes.  Use fresh herbs, veggies, olives, capers, chili peppers, garlic or even nuts...you can't go wrong.


Baked Feta with Black Olives, Lemon and Thyme
Origin: Greece? Adapted by Jaime, Impeccable Taste

Notes:  The ingredients and measurements listed are just guidelines.  Experiment and have fun with the flavours you love. 


Ingredients: 
1 block feta cheese (mine was about 1/2 lb)
freshly ground black pepper
zest of 1 lemon
2 tablespoons olive oil
1/3 cup pitted black olives, roughly chopped
2 teaspoons fresh thyme leaves


Preheat oven to 425 degrees.

Place block of feta in an oven safe baking dish (preferably one you want to serve out of).  Sprinkle feta with black pepper, scatter lemon zest on top and drizzle with olive oil.  Top with olives and thyme.

Bake for 20 about minutes, just keep an eye on it to make sure your toppings aren't getting too toasty.

Serve with a knife and some crusty bread, allowing the eater to assemble their own bites.

Serves 4-6 as an appetizer.

Tuesday, September 21, 2010

Roasted Corn Pudding in Acorn Squash


Seasonally speaking, this is a great transitional dish.  It brings together sweet, summer corn and an autumnal vibe from the season's first squash.  This is a winning vegetarian recipe.  Inside those cheesy, perfectly roasted acorn squash halves lies a savoury corn pudding studded with scallions and anise seed.  It's hearty and warming, and healthy as the pudding gets its heft from a mostly egg white and milk base.  It's fun to dig into and immensely satisfying.  I think it's special enough to make it's way onto a Thanksgiving table as a vegetarian main course, as it has at our place with great success.


Roasted Corn Pudding in Acorn Squash
Origin: adapted by Heidi Swanson, 101 Cookbooks

Notes: This is another great recipe from my long time favorite - 101 Cookbooks.  Have you gone over there yet?  You won't be sorry.  It is full of healthy innovative recipes with great pictures and stories.
You can bake leftover corn pudding in ramekins or a small oven safe dish for 20 minutes alongside the squash, however it's best when eaten with the squash.  This recipe takes a while to prepare because of the lengthy roasting time...but it's easy to do.

Ingredients:
1 small acorn squash, cut in half lengthwise and seeded
1 tablespoon olive oil
1 cup milk
1 egg plus 2 egg whites
1/2 cup fresh corn kernels (or more if you like)
1/4 teaspoon anise seed, chopped
1/2 cup chopped scallions
a tiny pinch of freshly grated nutmeg
1/4 teaspoon fine grain sea salt
1/3 cup grated white cheddar cheese

Preheat the oven to 375 degrees with a rack in the middle.

Rub the orange flesh of the squash with the olive oil. Place cut side up on a baking sheet. You will want it to sit flat (and not tip), if you are having trouble just level out the bottom using a knife. If the squash is tilting on the pan, the filling will run out - bad news. Cover the squash with foil and bake for 40 minutes or until the squash starts to get tender.

In a bowl combine the milk, eggs, corn, anise seed, half of the scallions, nutmeg, and salt. Fill each of the squash bowls 3/4 full. Carefully transfer the squash back to the oven without spilling. Continue baking uncovered for another 30-50 minutes, or until the squash is fully cooked through, and the pudding has set. The amount of time it takes can vary wildly depending on the squash and oven.

At the last minute sprinkle with cheese and finish with a flash under the broiler to brown the cheese. Keep and eye on things, you can go from melted cheese to burnt and inedible in a flash. Serve hot sprinkled with the remaining scallions.

Serves 4.


Sunday, September 19, 2010

Applesauce Granita with Maple Yogurt


Okay, this is a weird one.  Maybe even more weird than Dukkah.  5 wholesome ingredients, 10 seconds of effort and hello...a super healthy, scrumptious treat.  Crazy.  It tastes great, it's seriously easy to make and you can feel good about eating it.


Applesauce Granita with Maple Yogurt
Origin: Melissa D'Arabian, Food Network


Notes:  Great snack for kids.  You can use honey in place of the maple syrup if you prefer.  You may need more than the recommended hour for the granita to firm up, but don't leave it in the freezer for more than 3 hours or you'll have a hard time scraping/loosening the applesauce.


Ingredients:

Granita
2 cups unsweetened applesauce
1 teaspoon lemon juice

Maple Yogurt
1/2 cup plain yogurt
1 tablespoon maple syrup (real)
1/2 teaspoon cinnamon

In a shallow 8-inch square pan, stir the applesauce and lemon juice together and spread the mixture evenly in the pan. Place the pan in the freezer for at least 1 hour.

For the yogurt sauce, combine the yogurt, maple syrup, and cinnamon in a small bowl. Chill the sauce until ready to serve.

Remove the granita from the freezer. With a fork, scrape the surface of the granita to fluff it up.

Serve immediately drizzled with yogurt sauce.

Thursday, September 16, 2010

Dukkah


I’ve been fixated on food blogs for more than a few years now.  First it was food TV, then I discovered food magazines followed by food magazine websites...and then came food blogs.  This was my path to enlightenment.  Since discovering this life changing tool known as the food blog I’ve been trolling the internet, clicking on links, searching endlessly for those precious few blogs that keep me coming back for more. Those blogs that just get me…like we have the same taste.   
101 Cookbooks was the first blog that really blew my mind, it got me hooked.  I trust the authors of the blogs I love, and if they say something is fantastic...well, I just have to try it.  So when the author, Heidi Swanson said make Dukkah, I made Dukkah. It's a Middle Eastern mixture of toasted and ground, nuts, spices and seeds.  The idea is to take bread, dip it in olive oil and then into the Dukkah so it adheres.  The warm, spicy but not fiery mixture is intensely flavoured with a little crunch.  The flavours are surprising and addictive.  There are probably a million different versions of Dukkah, this is the first and only one I have tried.  I don't want to mess with something so good.


Dukkah
Origin: 101 Cookbooks, from this book

Notes:  I always double this recipe when I make it.  It lasts in an airtight container for up to a month.  I store mine in a mason jar in the fridge.  It is a great appetizer or snack with pita bread or a crusty loaf dipped in olive oil.  It would be a great addition to a Middle eastern platter with Hummus, Tabbouleh and pita.  Or you can use Dukkah for other things like crusting chicken or maybe a warm crusted goat cheese round.  The spice list might seem intimidating to some, but if you have a bulk spice resource (such as Bulk Barn around these parts) you can get it all in one spot.  I have a plastic container that I keep specifically for my little bags of Dukkah spices and nuts which I just pull it out when I want to make it.

Ingredients:

1/2 cup hazelnuts
1/4 cup coriander seeds
3 tablespoons sesame seeds
2 tablespoons cumin seeds
1 tablespoon black peppercorns
1 teaspoon fennel seeds
1 teaspoon dried mint leaves
1 teaspoon salt

Heat a heavy bottom, medium sized skillet over medium-high heat.  Toast each ingredient separately (except for mint and salt), tossing it around in the skillet for a couple minutes or until fragrant, taking care not to burn anything.  After toasting each ingredient one at a time, transfer to your food processor or a mortar and pestle to cool completely.  Once cooled, add mint and salt and pulse or crush until coarsely chopped.  Be careful not to turn the mixture into a paste, it should be like coarse sand with small pebbles.

Monday, September 13, 2010

Autumn Apple, Pear and Cheddar Salad with Pecans


It's officially a week after Labour day...are we good to go here?  Can I post something with the word "autumn" in it without hurting anyone's feelings?  I swear, this salad will make you forget summer even existed....it is beyond good.  The dressing is crucial to the success of this salad, reduced apple juice with apple cider vinegar to balance the sweetness.  I always get asked for the recipe when I pull this one out, but I've been seriously protective of it.  I've given out the recipe to a select few people and sworn them to secrecy.  Now, here I am sending it out into the world...this blog does weird things to me.


Autumn Apple, Pear, Cheddar Salad with Pecans
Origin: Adapted from Cooking Light Magazine
  
Notes:  So.  Freakin.  Good.  Enjoy.  (see my changes in brackets below)


Ingredients:

Dressing
1  cup apple juice
2 - 3 tablespoons cider vinegar
1  teaspoon extra virgin olive oil (I use 3 tbs olive oil - equal to juice/vinegar)
1/2  teaspoon salt
1/4  teaspoon freshly ground black pepper

Salad
10 cups salad greens (about 10 ounces) (I use red leaf lettuce or romaine usually - maybe 6 cups)
1  medium McIntosh apple, cored and cut into thin wedges
1  medium Bartlett pear, cored and cut into thin wedges
1/4 cup finely shredded sharp cheddar cheese (more to taste)
3  tablespoons chopped pecans, toasted (more to taste)

Place apple juice in a small saucepan, and bring to a boil over medium-high heat.  Cook until reduced to about 3 tablespoons (about 10 minutes).  Combine reduced apple juice, vinegar (I use equal parts reduced apple juice and cider vinegar), oil, salt, and pepper, stirring with a whisk.

Combine greens, apple, and pear in a large bowl.  Drizzle with dressing, toss gently to coat.  Sprinkle with cheese and nuts.

Serves 4-6.

Sunday, September 12, 2010

Salted Butter Break-Ups


It's a lazy, gloomy Sunday afternoon here.  My neighbor has his fireplace going and the air smells like Fall.  I don't see myself leaving the house today...not that I mind one bit, I love dreary days like this.  I have time to bum around the kitchen and discover new snacks.  With a hot cup of jo, this new leisurely, homey cookie was a perfect foil to the day, wrapped up in crispy, salty/sweet bite.


This recipe for Salted Butter Break-Ups is from Dorie Greenspan's new cookbook,  Around My French Table:More Than 300 Recipes from My Home to Yours.  After flipping through this new book excitedly, I didn't know where to start.  Today I saw this one at Lottie and Doof and it looked so perfect for a laid back afternoon like this.


Salted Butter Break-Ups
Origin: Around My French Table, Dorie Greenspan

Notes:  This recipe came together really quickly in the food processor.  I needed all 5 tablespoons of water to get my dough to a good consistency.  The dough should be well chilled and you need to use the wax paper when rolling it out as it is really sticky.  The wax paper helps you transfer the dough to the parchment lined baking tray easily.  Do not skip the egg yolk glaze.

Ingredients:
1 3/4 cups flour
2/3 cup sugar
1 teaspoon sea salt or kosher salt
9 tablespoon cold, unsalted butter, cut into 18 pieces
3-5 tablespoons cold water
1 egg yolk (glaze)

In a food processor, combine the flour, sugar, and salt. Pulse them to combine. Add the butter and pulse until the mixture looks like coarse meal with pea-sized pieces and small flakes. With the machine running, add the cold water gradually, just until the dough almost forms a balls. It should be malleable.

Scrape the dough out onto a large piece of plastic wrap. Form it into s flat square by folding up the sides of the plastic wrap and patting down the dough. Wrap completely and refrigerate for at least one hour and up to 3 days.

Preheat oven to 375 degrees. Line a baking sheet with parchment paper or a silicone mat.

When ready to bake, unwrap the chilled dough and roll it out between large pieces of wax paper (I used 2 pieces overlapped on both the top and bottom) Roll to a thickness of 1/4 inch into any shape that will fit in the baking pan. Using the bottom piece of wax paper transfer the dough to the baking sheet. Brush the dough with the egg wash. Using the tines of a fork, mark a crosshatch pattern into the dough.

Bake the cookie for 30-40 (I did 35 minutes) minutes or until golden brown and it springs back slightly when pressed in the center. Cool the large cookie completely on a cooling rack. Break up the cookie as you wish.

Tuesday, September 7, 2010

Chocolate Bar Cheesecake


This weekend I had a fun task.  Prepare a romantic "motorbike" picnic for some friends.  The picnic items had to endure a motorcycle ride in a backpack. There were a couple of specific requests too, one of them...mini cheesecakes.  I was down with mini cheesecakes.  I didn't get any specifics with regards to toppings.  Fruit?  Chocolate?  So I decided I would make a classic cheesecake recipe and play around with the toppings, they were minis so I could do that.  I made 12 minis total (plenty for a picnic for 2).  I topped 6 of them with blueberry jam (warmed and strained smooth) and a couple of fresh blueberries.  The other 6 I decked out in chopped Mars Dark chocolate bars.  After the minis were set, I was left with a serious amount of batter and crust so I made an impromtu 8" leftover cheesecake.  Given the choice between fruit and chocolate for the topping...I chose chocolate, hands down.  I think it will be chocolate for me, always and forever.  This recipe made a perfect, true classic cheesecake.  Both the cake and the minis were insanely delicious.


Chocolate Bar Cheesecake
Origin: Adapted from this recipe


Notes:  The author of the original cheesecake recipe I used, provides many additional guidelines including using a water bath to bake the cheesecake.  Remember, I made 12 minis and a smaller version of the cake.  I baked both without the waterbath...the minis for 20 minutes and 45 minutes for the medium sized cake...it worked just fine.  Small cracks formed around the edges of the bigger cake just as it finished baking but it didn't bother me.  If I was serving this to guests I might arrange the chocolate bar topping into a pretty pattern or add some chocolate ganache to hide imperfections and add flair.  When working with the whole batch of crust and batter you will have enough graham crumbs to work up the sides of the pan for additional crust and the cake will be higher than pictured.  Visit this link for additional baking instructions.


Ingredients:

Crust
2 cups graham cracker crumbs
1 stick unsalted butter (1/2 cup), melted
3 tablespoons granulated sugar
1/2 teaspoon salt

Cheesecake
4 8oz blocks cream cheese, room temperature
1 1/4 cups granulated sugar
4 eggs, room temperature
3/4 cup heavy cream, room temperature
1 tablespoon vanilla extract

Topping
3 cups chopped chocolate bar of your choice (I used 8 Mars Dark bars)

Preheat oven to 350 degrees, very lightly grease or spray a 9" springform pan.  (Or you can make mini cheesecakes or play around with 12 minis and 1 smaller 8" cheesecake as I did.  Just adjust baking times, see notes above.)

Mix together crust ingredients and press the mixture into the bottom of the pan and 1 inch up the sides of the pan.  Bake for 7 minutes, cool completely on a wire rack.  Once cooled sprinkle 1 cup of chopped chocolate bar on top of the crust.

In the bowl of a stand mixer fitted with the paddle attachment, cream the cream cheese until smooth.  Add the sugar and cream until incorporated.  Add eggs, one at a time, scraping down the sides of the bowl, making sure each egg is incorporated before adding the next.  Add heavy cream and vanilla, mix until smooth.

Pour the batter over the prepared crust, (if making one large cheesecake, this is where you might want to consider checking this link for tips on a baking your cheesecake) bake for approximately 55 minutes (mine started to pull away from the sides of the pan and it cracked a little around the edges).  Place on a cooling rack and cool completely.

Place cooled cake in the fridge for at least 5 hours to set.  Let stand at room temperature for at least half an hour, top cake with remaining chocolate bar pieces, pressing into the cake slightly to adhere.  Serve cake at room temperature.

Wednesday, September 1, 2010

Sweet Corn Relish


It's the time of year when I become frantic for local fresh produce.  I live in fear that within the blink of an eye there will be no more perfect tomatoes, no more sweet, crisp corn, no charming, multicolored carrots, no plump, juicy peaches and no more fresh, sweet berries to be had anywhere.  I am currently in a frenzy trying to get my fill.  Last night on my way home from work I bought a dozen corn, 4 bunches of carrots, 1 massive green cabbage, 2 huge local cauliflowers, 4 red shepherd peppers, 2 pounds of tomatoes and 4 field cucumbers...for 2 people.  I told you...frantic.  I need to take a deep breath and cook.  Let's start with the picture perfect corn, cabbage and red peppers.  I have just the thing.  Sweet Corn Relish.  This is a fresh, flavourful, relish that is great served as an accompaniment to grilled chicken or steak or try adding it to salad greens.


Sweet Corn Relish

Notes:  This recipe is super easy.  You just throw everything in a pot and simmer it for a while.  My liquid never evaporated as the instructions say...it just got more juicy as the veggies released their moisture.  I strained the mixture before I put it into jars, but next time I will leave a little liquid in the jars for extra flavour and juiciness.  The author says this relish will keep for up to 6 weeks in an airtight container...but I don't see mine making it past this weekend.

Ingredients: 
6  cups  fresh corn kernels (about 8 ears)
3  cups  chopped green cabbage
1  cup  chopped red bell pepper
1  cup  cider vinegar
1/2  cup  sugar
1/2  cup  chopped shallots (about 2 large)
2  teaspoons  celery seeds
2  teaspoons  mustard seeds
1  teaspoon  salt
1  teaspoon  cumin seeds
1/2  teaspoon  ground turmeric
1/8  teaspoon  crushed red pepper

Combine all ingredients in a Dutch oven (big heavy pot) and bring to a boil.  Reduce heat and simmer, uncovered, 20 minutes or until vegetables are tender and most of liquid evaporates, stirring frequently.  Cool mixture and transfer into airtight containers.